UFT – Unified Functional Testing

HP Unified Functional Testing (UFT) is a recent tool released in December 2012. It integrates two HP testing products in a common IDE. It provides a powerfull testing framework for GUI and API testing:

  •   HP Service Test (ST)
  •   HP QuickTest Professional (QTP)
HP UFT has enhanced, and brand new functionalities that are not available in previous versions of HP Service Test or HP QuickTest Professional.
Some important considerations

  • Licenses for QTP or ST will work for UFT, but they can restrict some features. It’s recommended to upgrade to UFT Licenses to take advantage of the complete functionality provided by the tool.
  •  If only API Testing is required, HP Service Test Standalone can be used, however this option is not available for GUI testing.
  • UFT offers integration with Perfecto Mobile in order to perform Mobile Testing.
  • UFT also offers new Add-ins for GUI testing as such as: QT and Flex.
  • UFT is not considered to be the newer version of either QTP or ST. It is a separate new product which contains most of the functionalities already seen in QTP and ST, including some new features.
QTP’s Product Availability Matrix [PAM]       
Its’s a basically a PDF file that contains information on what all Products/Standards are supported by QTP. For each version of QTP, HP releases a separate PAM file which specifies the products that are supported /not supported by that version of QTP.
Now you can automate the functional testing of transactions that span multiple application layers, cutting the cost and complexity of the testing process while improving application quality.
  • Validate multi-layer test scenarios with a single, integrated solution
  • Start automating functional testing earlier and accelerate time-to-market
  • Discover defects you would have missed if you only tested the functionality exposed through the graphical user interface (GUI) or a single service or component
  • Reduce training and tool costs with a solution that addresses GUI, non-GUI, and multi-layer testing

What are the critical patches available for Unified Functional Testing (UFT)?

Feature Version Patch Description
UFT Core Product 11.5 UFT_00001 +
UFT_00037
UFT 11.5 + Service Pack 1 + Patch 1
HP UFT Add-in for ALM 11.5 UFTALM_00001 +
UFTALM_00033
UFT Add-in 11.5 for ALM + Service Pack 1 + Patch 1
HP Results Viewer 11.5 UFTRRV_00001
UFT RRV Service Pack 11.51
HP Extensibility Accelerator 11.5
UFTEXA_00001

UFT EA Service Pack 11.51
Note: The “ALM Integration Enablement Pack” (required for UFT to connect to ALM 11.5) is a pack to be installed on ALM server, not on UFT client

Test Script Compatibility Between QTP-UFT Versions

https://qtp4experts.wordpress.com/2014/02/23/test-script-compatibility-between-qtp-uft-versions/

Backwards or Forward compatibility between QTP /UFT versions (to open test script)

Below find the matrix of test compatibility (to open scripts):

Versions

QTP 9.2

QTP 9.5

QTP 10.0

QTP 11.0

UFT 11.5 (GUI Tests)

QTP 9.2 Scripts

Supported

Supported

Update Required

Update Required

Update Required

QTP 9.5 Scripts

QTP_00538

Supported

Update Required

Update Required

Update Required

QTP 10.0 Scripts

Not supported

Not Supported

Supported

Supported

Supported

QTP 11.0 Scripts

Not supported

Not Supported

Supported (*)

Supported

Supported

UFT 11.5 GUI Scripts

Not supported

Not supported

Supported (*)

Supported (*)

 Supported

  • Supported. Allows opening/modifying tests on mentioned versions
  • Not Supported. Tests may be tagged/warned such were created on a newer version, so it can’t be opened, even indicate errors.
  • Update Required.Tests requires update, so current version can work on it

Notes:

  • Tests / Assets / Resources (libraries, Shared object repositories, etc) last saved in QuickTest 10.00 or later can be opened in QTP 11, UFT 11.5 or later, without needing upgrade, regardless if stored on file system or QC / ALM

  • If when tyring to open in QTP 10 / 11 or UFT 11.5 or later, a test or component last saved in a version of QuickTest equal or earlier than 9.5, an error message is displayed in the Error Pane. So:
  • If the test is saved in the file system, End-user must first open it in QuickTest 10.00 or 11.00 to upgrade it.

Note: On UFT 11.5, it may simply open as Read-only, and not provide option to convert. As workaround, open test in read-only and use the “Save As” option.

  • If the test is saved in Quality Center or ALM, you must use the HP Asset Upgrade Tool(available with the QuickTest Professional 10.00 or 11.00 DVD). For more information see Document ID KM896902 – What is the HP Asset Upgrade Tool?
  • (*) There are features from newer versions of QTP that will not work on older versions. For example QTP 11 XPath feature or Visual Relation feature; UFT 11.5‘s Insight,Flex or Qt add-ins.

  • Chart above, only refers to availability for “opening scripts” from old version on newer versions of product. The “Run-without-errors/problems” compatibility between versions, cannot be assure 100%, considering test-objects/properties can change between versions. Any error of script runs, must be debugged and analyzed separately(review differences between versions regarding test objects, its properties and respective values, etc) before considering functionality problems on the new version of product.

  • There are no plans of supporting the opening of QTP scripts version 10/11 (or higher) on QTP 9.2 or 9.5.

Four Different Ways to Associate Function Libraries to our QTP Scripts

Most of the times, when you are creating test scripts or are designing a new QTP Framework, you would be trying to come up with reusable functions which you would have to store in the function library. Now, in order to use this function library with multiple test cases, you need to associate this function library with your scripts. This article explains the 4 methods that will help you in associating the function libraries in QTP Test Cases.

Based on the type of framework you are using, you can use any of the following methods to associate function libraries to your QTP Script –

  • 1) By using ‘File > Settings > Resources > Associate Function Library’ option in QTP.
  • 2) By using Automation Object Model (AOM).
  • 3) By using ExecuteFile method.
  • 4) using LoadFunctionLibrary method.

Let’s see in detail how each of these methods can be used to map function libraries to your test scripts.

1. Using ‘File > Settings > Resources > Associate Function Library’ option from the Menu bar

This is the most common method used to associate a function library to a test case. To use this method, select File > Settings option from the Menu bar. This will display the ‘Test Settings’ window. Click on Resources from the left hand side pane. From the right hand side pane, click on the ‘+’ button and select the function library that needs to be associated with the test case.

Associate function Library to QTPAssociate function Library to QTP

2. Using AOM (Automation Object Model)

QTP AOM is a mechanism using which you can control various QTP operations from outside QTP. Using QTP Automation Object Model, you can write a code which would open a QTP test and associate a function library to that test.

Example: Using the below code, you can open QTP, then open any test case and associate a required function library to that test case. To do so, copy paste the below code in a notepad and save it with a .vbs extension.

1
2
3
4
5
6
7
8
9
10
11
12
13
'Open QTP
Set objQTP = CreateObject("QuickTest.Application")
objQTP.Launch
objQTP.Visible = True
'Open a test and associate a function library to the test
objQTP.Open "C:AutomationSampleTest", False, False
Set objLib = objQTP.Test.Settings.Resources.Libraries
'If the library is not already associated with the test case, associate it..
If objLib.Find("C:SampleFunctionLibrary.vbs") = -1 Then ' If library is not already added
  objLib.Add "C:SampleFunctionLibrary.vbs", 1 ' Associate the library to the test case
End

3. Using ExecuteFile Method

ExecuteFile statement executes all the VBScript statements in a specified file. After the file has been executed, all the functions, subroutines and other elements from the file (function library) are available to the action as global entities. Simply put, once the file is executed, its functions can be used by the action. You can use the below mentioned logic to use ExecuteFile method to associate function libraries to your script.

1
2
3
4
5
'Action begins
ExecuteFile "C:YourFunctionLibrary.vbs"
'Other logic for your action would come here
'.....

4. Using LoadFunctionLibrary Method

LoadFunctionLibrary, a new method introduced in QTP 11 allows you to load a function library when a step runs. You can load multiple function libraries from a single line by using a comma delimiter.

1
2
3
4
5
6
7
8
'Some code from the action
'.....
LoadFunctionLibrary "C:YourFunctionLibrary_1.vbs" 'Associate a single function library
LoadFunctionLibrary "C:FuncLib_1.vbs", "C:FuncLib_2.vbs" 'Associate more than 1 function libraries
'Other logic for your action would come here
'.....

This was all about the different ways using which you can associate function libraries to QTP Scripts. What are your views on this article? Can you think of any other points which I have missed and can be added here? Please let us know your views using the comments section. Happy Reading.. :–)

Reference: http://www.automationrepository.com/2011/09/associate-function-library-to-qtp-script/

Does QTP / Unified Functional Testing Support Flex?

Supports will depend on the version of Adobe Flex versions used to develop an application:

Flex SDK

QTP 11 and below

UFT 11.5

lower than v4.5

Adobe QTP Flex Add-in

No

v4.5

No

HP UFT Flex Add-in

HP Unified Functional Testing (UFT) Flex Add-in

To use the HP Flex Add-in, the Flex application must be prepared/configured/setup accordingly with HP Flex Add-in agent files. For more information see, Document ID KM00339739 – How to Prepare Flex Applications for Testing with HP Flex add-in?

Starting UFT 11.5, HP provides support for specific versions of Flex, with the HP Flex Add-in for GUI testing. Any other versions (mostly older), are not supported by UFT. We suggest trying QTP with Adobe Flex Add-in (see below).

There is no current plans of providing backwards compatibility with Adobe QTP Flex Add-in, so scripts using such version cannot be ran nor upgraded to be used with the UFT Flex Add-in.

For more information about limitations, see Troubleshooting and Limitations – Flex Add-in“, within the “Chapter 13 – Flex Add-in” of the HP UFT Add-ins Guide

Adobe QuickTest Professional (QTP) Flex Add-in

IMPORTANT: Hewlett Packard does not support the Adobe Flex add-in, only HP Flex add-in (read section above), therefore we strongly suggest contacting Adobe (http://www.adobe.com) to see about availability, support details, and pricing.

If yor are currently using the Adobe QuickTest Professional Flex Add-in, support forAdobe (Macromedia) Flex applications must be handled by Adobe.

Adobe has a Flex Builder; commonly this includes the QuickTest Professional Flex add-in. The add-in was developed using QuickTest Professional’s Test ExtensibilityArchitecture functionality. The Flex add-in is developed and owned by Adobe.

Adobe is providing the add-in via an automation package that is shipped with Flex Builder 3 Professional. Basic information on the automation package with QuickTest Professional integration is here:

Users can download the automation package with QuickTest Professional integration here: http://www.adobe.com/cfusion/tdrc/index.cfm?product=flex

A specific Adobe license is required and needs to be requested from Adobe. No specific Flex license is required on the QuickTest Professional side.

Note: Support for the Flex add-in is being provided by Adobe. Customers/end-users need to contact the Adobe support organization for help with problems or questions related to the Flex add-in.

From the Flex Builder 3 release notes (for an updated version, contact Adobe):

Requirements for Using the QTP Plug-in 
To test applications with Flex Automated Testing and the QTP agent, you must install the following:

  • HP QuickTest Professional 9.1 (no support for Smart Identification), available from HP
  • HP QuickTest Professional 9.2 and patch 1701 or later if you want Smart Identification support
  • Adobe Flex 3 Plug-in for HP QuickTest Professional
  • Microsoft Internet Explorer, version 6 or later
  • Flash Player ActiveX control, version 9.0.28.0 or higher

How to clean uninstall Unified Functional Testing (UFT)?

As of right now, there is no specific specialized uninstallation process for UFT 11.5 or higher, so HP recommends:

  1. Review Requirements:

    Important. Same as QuickTest Professional (QTP) or Service Test (ST), full admin rights and UAC off is required before doing steps below. For more information seeDocument ID KM183747 – What are the minimum permissions required for QuickTest Professional (QTP)?

  2. Check the optional tasks
    1. (Optional) Backup licensing information:
    2. (Optional) Backup Test/Resources stored locally (if on ALM/QC, ignore step)
  3. Uninstall any non-core add-in/utilities. 

    Remove any of the below items if exist on machine from the “Programs and Features” under Windows Controls Panel’s (or Add/Remove Programs for operating systems older than Windows Vista), before continuing:

    • Unified Functional Testing (UFT) Add-in for Application Lifecycle Management (ALM) / Quality Center (QC)
    • .NET Extensibility Add-in
    • WPF/SilverLight Extensibility Add-in
    • Java Extensibility Add-in
    • Web  Extensibility Add-in (if displayed)
    • Extensibility Accelerator Note: ensure to backup EA projects before uninstalling it

  4. Uninstall Unified Functional Testing from the “Programs and Features” under Windows Controls Panel’s (or Add/Remove Programs for operating systems older than Windows Vista)

  5. Delete any traces left.

    Review and check for traces mentioned on below documents, under the “Delete any traces left” section:

Note: The uninstallation steps above, or related documents, do not indicate removing any of the components used by tool (prerequisites or post-installation requirements). If end-user needs to remove then, collect the versions information of those currently installed on client machine, this in case other separate products unrelated to UFT is affected.

Does QuickTest Professional (QTP) and/or Unified Functional Testing (UFT) support Citrix?

 For more information about Citrix XenApp product, see external reference:http://en.wikipedia.org/wiki/Citrix_XenApp
Supported versions

Citrix MetaFrame Presentation Server

QTP 9.2

QTP 9.5

QTP 10.0

QTP 11.0

UFT 11.5 GUI

Version 4.0

Yes

Yes

Yes

Yes

No

Version 4.5

No

No

Yes

Yes

Yes

Version 5

No

No

Yes

Yes

Yes

Version 6 (Xenapp)

No

No

No

Yes

Yes

Notes:

  • XenApp” is the new name for newer versions of Citrix (6 and higher). For more information see Document ID KM870314 – Difference Citrix Metaframe Presentation Server and XenApp?
  • “Citrix XenDesktop” isn’t supported.
  • If QTP 11 isn’t viewing run results on Citrix XenApp 6, check with HP Support about testing Hot-Fix QTP_00857 (This is a private patch only provided by HP Support, so if needed, please submit a case)

Scope of support (What Citrix implementation is supported)

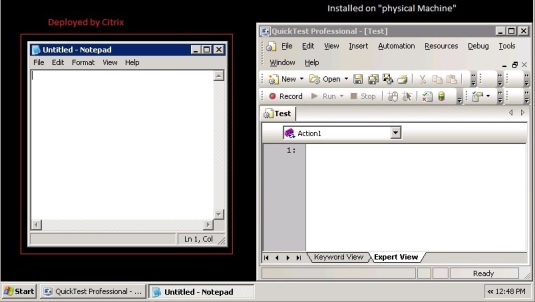
(IMPORTANTRequirements: To record and replay against application(s) hosted on a Citrix environment, both QTP / UFT and application under testing (AUT) must be:

  • Installed on the same machine (usually the server).
  • Running within the same Citrix session.

Example Scenario 1:

  • Application Under Testing (AUT) Location: Installed and hosted on Citrix server
  • QTP / UFT Location: Installed on client
  • StatusNot Supported.
  • Notes: If try to record and replay against the application, QTP / UFT will not recognize individual objects. In fact, QTP / UFT will view the entire session Window as one object.

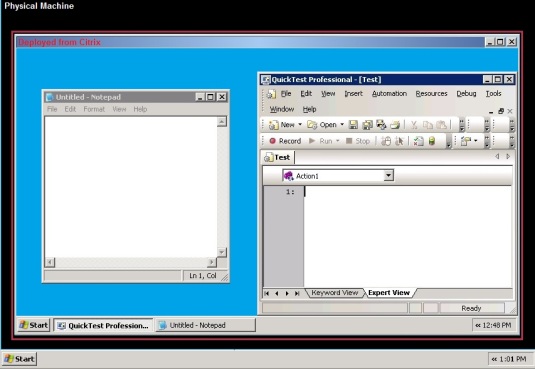
Citrx1Example Scenario 2:

  • Application Under Testing (AUT) Location: Installed and hosted on Citrix server Status: Supported.
  • QTP / UFT Location: Installed and hosted on Citrix server
  • Requirement:Both QTP and AUT must be under same Citrix Session (this may required special configuration). See ilustration below to check recommended scenario where support works appropiately
  • Notes: Citrix hosting a virtual version of a Windows operating system and within such, both QTP / UFT and the AUT are installed; QTP / UFT will be able to interact virtually with any item/element/program installed on such operating system as if it were a physical operating system. This is normally seeing as “using the same session”

Citrx2
Note:One suggestion to determine if the QTP / UFT recognition works fine on same Citrix session

When using the Object Spy, the pointy hand cursor (when actually spying) remains the same (stays as pointy-hand-cursor, instead of the default icon/cursor, such as the pointing-arrow). If it changes back while still actually spying (while hovering mouse on top of desired application to spy), AUT and QTP / UFT are not using the type of same session required.

License Requirements

It is required to use a concurrent (floating) license to operate QTP / UFT in a Citrix environment.

For more information, please refer to:

More feedback

From the QTP / UFT documentation:

When running QuickTest on a remote machine using a Remote Desktop Connection session (RDC) or using Citrix, if the remote session is minimized during the run session, or if the computer on which the application is being tested is logged off or locked, the following problems may occur:

  • the test or component run session may fail
  • steps that contain keyboard or focus operations may fail
  • the Test Results still image capture and/or the Mercury Screen Recorder may display a black screen
  • steps for which the device level replay is configured to use the mouse (instead of browser events) to run mouse operations may fail. (Set the device level replay using a Setting.WebPackage(“ReplayType”) statement or by setting the Replay type option in the Advanced Web Options dialog box.)

Workaround: If using Citrix or a Remote Desktop Connection session to run a test or component, do not minimize the session window, and make sure that the computer on which the application is being tested is not logged off or locked.

Critical patches available for Unified Functional Testing (UFT)

Feature -Patch

Core Product –UFT_00001 – UFT Service Pack 11.51

HP UFT Add-in for ALM – UFTALM_00001 – UFT Add-in Service Pack 11.51 for ALM

HP Results Viewer – UFTRRV_00001 – UFT RRV Service Pack 11.51

HP Extensibility Accelerator – UFTEXA_00001 – UFT EA Service Pack 11.51

Note: The “ALM Integration Enablement Pack” (required for UFT to connect to ALM 11.5) is a pack to be installed on ALM server, not on UFT client

What is the difference between QTP and UFT ?


HP Unified Functional Testing [UFT] is a new tool released in December of 2012 that integrates two of HP Testing products in a common IDE. It provides a powerfull testing framework for GUI and API testing:

  • HP Service Test
  • HP QuickTest Professional

HP Unified Functional Testing has enhanced, and brand new functionalities that are not available in previous versions of HP Service Test or HP QuickTest Professional.

Some important considerations

  • Many, not all, of the knowledge base articles available for HP QuickTest Professional 10, 11 and HP Service Test 11.20 can be applied to HP Unified Functional Testing product.
  • Licenses for QTP or ST will work for UFT, but they can restrict some features. It’s recomendable to upgrade to UFT Licenses to take advantage to the complete functionality provided by the tool.
  • If you just need API Testing, you can use HP Service Test Standalone, however this option it’s not avaialble for GUI testing.
  • HP Unified Functional Testing offers integration with Perfecto Mobile in order to perform Mobile Testing.
  • HP Unified Functional Testing offers new Add-ins for GUI testing as such as: QT and Flex.
  • HP Unified Functional Testing is not considered to be newer version of either QuickTest Professional or ServiceTest.

Know more about HP UFT 11.5 [Click to download]

HP UFT 11.5 [Unified Functional Testing tool]

-Its an unique platform for testing almost all kind of applications.

– HP QTP’s latest version, combination of QTP and Service Test

– Key Benfits:

  • Automate testing of multi-layer test scenarios, including GUI and API testing.
  • Powerful visual user experience and toolset
  • Testing of emerging technologies with innovative HP UFT Insight object recognition
  • Easy conversation of manual tests to automated  tests
  • Framework definition for better test management thanks to tight integration to HP Business Process Testing and HP Application Lifecycle Management

Link

Reasons for Why BPT is a Great Testing Framework

1) You can build and run tests quickly and easily

BPT speeds up test creation, maintenance and execution through reuse of components.

2) You don’t have to be an automation expert to use BPT

Manual testers, automation engineers, and subject matter experts can all use BPT effectively.

3) People in different testing roles can all work together

BPT helps you document your components and tests, including screenshots, how they should be used, etc. This makes it easy for people with different roles and skillsets to share each other’s assets.

4) You can run the same test automatically and manually

You’re free to choose how to run your tests. And if you want to automate your existing manual tests, you can continue to run them manually until you’ve completed the automation.

5) You don’t need to build your own framework

Creating a framework is expensive and time consuming. You avoid all of that with BPT, which gives you everything you need out of the box, and is fully customizable so that you can tailor it to the way you and your organization work.

6) You can easily create and update tests for SAP, Oracle, and other so-called ‘packaged applications’

You can use pre-configured test assets such as those offered by TurnKey to save time and effort in testing leading ERP and CRM applications.

7) Testing can start early

Keywords and components can be defined before the application has been delivered for testing, so you can design tests earlier in the software development lifecycle.

8) You’re encouraged to plan your testing activities in advance

BPT helps you think about what you’re going to test, how you’re going to test it, and the components and other assets you’ll need.

9) BPT is fully integrated with HP’s test management and testing tools

BPT is tightly integrated with lots of HP tools – for example, Application Lifecycle Management, QuickTest, Service Test, Sprinter, etc., so you don’t need to learn a whole new set of tools.

QTP object identifications issues when working with .Net Application

Points to ponder when you face QTP Object Identification issues working with .Net Applications:

  • Check which object controls they have used in .Net Application development. Like:
  • Infragistics NetAdvance object controls:
  1. TestAdvantage for Windows Forms 2007 contains QuickTest Professional Custom Libraries for the Infragistics NetAdvantage for Windows Forms 2007 Volume 1 Controls. QuickTest Professional and .NET Add-In
  2. HP’s QuickTest Professional provides the industry’s best solution for functional test and regression test automation – addressing every major software application and environment. QuickTest Professional employs the concept of keyword-driven testing to radically simplify test creation and maintenance.
  3. http://www.infragistics.com/products/testadvantage-windows-forms-qhp/
  • DevExpress Object controls, QTP /DeveExpress Tech support doesn’t have any extension/plug-in to support the .Net Application developed using this object controls.
  • Verify whether you have installed the respective QTP Patches QTP_00699, QTPNET_00082,QTPNET_00096, Etc.. [As required for swf/wpf objects]
  • After installation, launch QTP and select the first radio button in Windows tab on Record & Run Settings window.

Key Enhancements in QTP 11.0

Click here to see ‘QTP Vs Selenium’ post 

1) Support for new Operating Systems:
QTP 11.0 has added new support for the following operating systems:

  • Windows 7
  • Windows Vista SP2
  • Windows Server 2008 SP2
  • Windows Server 2008 R2

2) Enhanced Data Management Facility:
QTP is now seamlessly integrated with HP ALM (Application Lifecycle Management) software. Quality Center (HP ALM) test configuration functionality enables us to determine at runtime which data sets to use for our tests.

ALM test configurations enable us to:

  • Unbind our data from our tests
  • Share common data sources across different tests
  • Filter our data to fit our testing needs
  • Increase requirements traceability
  • We store the data for our tests in the Quality Center Test Resources module in the form of data table resource files.

We can then define multiple test configurations for a test in the Test Plan module. When working with data-driven QTP tests in HP ALM, each configuration is a QTP test that is set to run with a selected data resource file and optional data filter settings.

One or more specific configurations of the test can be included in a Test Set to cover different parts of a requirement or to cover multiple requirements.

By using Quality Center test configurations, we can create more generic tests and reuse them by associating a different set of data with each. We can also reuse our data by associating the same data table file with multiple tests.

3) New Object Spy Functionality:
The Object Spy has the following new features:

  • Add an object to a repository: We can now add an object to the object repository directly from the Object Spy.
  • Highlight an object in our application: When we select a test object in the Object Spy Object hierarchy tree, we can then select to highlight the object in our application that corresponds to that test object.
  • Copy/paste object properties: We can copy the identification properties and values of a selected test object in the Object Spy and paste the details into any document. The details are formatted in programmatic description syntax. This option is especially useful if we want to compare the properties and values of two objects in our application or when creating programmatic descriptions.

Additionally, the Object Spy has a new, cleaner look and feel:

4) New Smart Regular Expression list:
The Smart Regular Expression list provides syntax hints that make it easier than ever to insert regular expressions into our test steps. It also enables us to access the Regular Expression Evaluator, which lets us test regular expressions to make sure they suit our needs.

5) New QTP-Service Test integration facility:
Now we can test our GUI and UI-Less Application Functionality in One Test. We can use QTP steps to start testing the GUI elements in our application, then call a Service Test test to validate service communications (standard Web Services, non-SOAP Web Services, such as REST, etc.), and then step back into our QTP GUI testing, all in a single test run.

The results of the QTP and Service Test steps are displayed in a unified report in the new Run Results Viewer.

6) New Run Results Viewer:
The new Run Results Viewer provides an Executive Summary page with summary data, pie charts and statistics for both the current and previous runs, a quick link to the previous run results, and more.

The Run Results Viewer displays the results of our run session in a set of panes that we can show, hide, move, dock, and otherwise customize to our needs.

We can install the Run Results Viewer as a standalone installation. This enables us to share the results of our tests with business analysts and developers who do not work with QTP.

7) New facility to hide the Keyword View:
If we prefer working only with the Expert View, we can now use an option in the Options dialog box to hide the Keyword View so that only the Expert View is displayed when we open QTP Professional.
8) Facility to add Images to Our Run Results:
We can now add a Reporter.ReportEvent statement that includes an image file path. This lets us add an image to the run results wherever one is needed.

9) New Log Tracking Functionality:
QTP’s new Log Tracking functionality helps us work with developers to pinpoint the root causes of unexpected behavior in our application.

When we enable log tracking, QTP receives the Java or .NET log framework messages from our application and embeds them in the run results.

We can click a log message in the results to jump to the relevant step in the run results tree, or we can click a step in the run results tree and view the log message that was generated at the time that the selected step ran. We can also specify that a log message of a particular level (or higher) will fail our test.

After we view the results, we can print or export the log tracking details to a file to show to a developer, or we can provide the developer with the standalone Run Results Viewer installation so that the developer can view and analyze the results directly on his or her own desktop.

10) Automatic Parameterization of Steps:
We can instruct QTP to automatically parameterize the steps in our test’s actions at the end of a recording session.

This enables us to create actions that can be used for a variety of different purposes or scenarios by referencing different sets of data.

We activate this option by selecting the Automatically parameterize steps option in the General tab of the Options dialog box. We can set the option to use Global Data Table Parameters or Test Parameters.

When we stop a recording session while this option is selected, QTP replaces the constant values in the test object operation arguments of our steps with either Data Table parameters or action parameters, based on our selection in the Options dialog box.

QTP performs this automatic parameterization for all relevant steps in any action in our test, in which we recorded one or more steps during that recording session.

If we work with HP ALM, and we select the Global Data Table Parameters option, we can map the generated parameters to the column names of a data resource and then use different configurations in our test sets.

11) New Visual relation identifiers:
We can now use visual relation identifiers to identify application objects based on other objects that are always near them.

This enables us to create a more reliable identification definition for test objects that are otherwise difficult to differentiate, and to ensure that the identification remains reliable even if the user interface design changes.

The Visual Relation Identifier Dialog Box provides the interface and tools to help us create and verify our visual relation identifier definitions.

12) Visual indication of Version Control Status of Tests:
If we are working with version control in HP ALM or Quality Center, QTP provides a visual indication to show us when an asset is checked into or out of a project.

Tests, components, and function libraries that are part of version controlled projects stored in HP ALM or Quality Center display an icon and/or text in the title bar, indicating their version control status.

13) Web 2.0 add-ins support:
QTP 11.0 provides Web Add-in Extensibility-based add-ins for ASP .NET Ajax, GWT, Yahoo UI, and Dojo Web 2.0 toolkits.

We can use these add-ins just as we would any other add-in. We can also use Web Add-in Extensibility or Extensibility Accelerator to customize the provided support to match our needs.

We install these add-ins by running the Web 2.0 Toolkit Support Setup from the Add-in Extensibility and Web 2.0 Toolkits option in the QTP setup window.

The operations supported for each Web 2.0 test object class are a combination of custom operations developed for that test object class and operations directly inherited from the corresponding (base) Web Add-in test object class.

14) New capabilities for working with Web-Based objects:
Following new testing capabilities are now available handling Web-Based objects.

a) Firefox Testing: Us can now record steps on Mozilla Firefox and use the.Object property to access the Firefox DOM.

b) XPath, CSS, Identifiers: Us can add the XPath or CSS identifier properties to instruct QTP to identify a Web object in our application based on its XPath location or CSS definition.

c) Event Identifiers: Us can also now use the attribute/* notation in the test object description to identify a Web-based object based on an event associated with that object. For example, us can add attribute/onClick as a property in a WebButton test object description to identify a button that is associated with the onClick event.

d) Embed or Run JavaScripts in our Web Pages: We can use the new EmbedScript/EmbedScriptFromFile and RunScript/RunScriptFromFile functions to embed JavaScripts in all loaded browser pages and frames or to run JavaScripts in specific pages. Use these scripts to perform operations on, or retrieve data from, the browser pages in our application.

15) New methods for testing Web-based Operations:
The following methods are available to test Web-based applications:

  • AnyWebBasedObject.RightClick / MiddleClick
  • Brower.ClearCache
  • Browser.DeleteCookies

16) New LoadFunctionLibrary statement:
The new LoadFunctionLibrary statement lets us load a function library when a step runs instead of at the beginning of a run session. This means, for example, that us can define conditional steps that use functions from various function libraries, but load only the required function libraries during a run session.

17) Improved checkpoints and output value objects management:
We can now manage checkpoints and output value objects when comparing, merging, and exporting object repositories just like any other test object, including filtering, searching, and conflict resolution.

18) Dual Monitor Support:
QTP recognizes objects across multiple monitors, meaning that our application display no longer needs to be limited to one screen. Alternatively, we can view QTP on one monitor while the steps run on our application on another monitor.

19) New QTP Asset Upgrade Tool for HP ALM and Quality Center:
The QTP Asset Upgrade Tool for HP ALM/Quality Center enables us to upgrade, in a batch, all the QTP assets in an HP ALM or Quality Center 10.00 project from QTP 9.5 or earlier to the current format and to convert testing document attachments to the resources and dependencies model.

The QTP Asset Upgrade Tool for HP ALM/Quality Center also enables us to upgrade our tests to use the new test configurations feature. If our tests contain data table parameters that are stored in the Global sheet of a QTP data table, this tool copies those data table parameters to our HP ALM or Quality Center project, enabling us to start working with HP ALM test configurations.

20) Test execution in minimized remote desktop protocol session:
We can now run QTP in a minimized RDP (remote desktop protocol) session in an RDP 6.0 or later client by setting a registry value on the remote computer.

21) Improved Web Add-in Extensibility:
We can now develop browser-independent Web Add-in Extensibility support sets that support testing custom controls on both Internet Explorer and Firefox, and on different versions of these browsers.

We can introduce external JavaScript libraries in our Web Add-in Extensibility support sets, enabling us to call their functions from within the JavaScript functions we develop to support custom controls.

QTP’s performance when learning, spying, and running steps on controls supported by Web Add-in Extensibility is improved.

22) Improved Business Process Testing:
QTP 11.0 provides the following enhancements for business process testing when working with HP ALM:

# Improved performance.

# Application areas are now stored in the HP ALM Test Resources module as resources.

This enables us to apply version control to an application area, view at a glance which components are using a specific application area, see which resource files are associated with a particular application area, share our application areas with other projects, and so on.

# Local system monitoring is now supported for component runs.

# All component parameters in HP ALM are now inserted as string value types. From HP ALM, we can use options to encrypt these parameter values or to apply dynamic date values.

23) New QTP-Service Test integration Facility:
The new QTP-Service Test integration enables us to test across the GUI and non-GUI layers of our application.

We can use QTP steps to start testing the GUI elements in our application, then call a Service Test to validate service communications (standard Web Services, non-SOAP Web Services, such as REST, etc.), and then step back into our QTP GUI testing, all in a single test run.

The results of the QTP and Service Test steps are displayed in a unified report in the new Run Results Viewer.

24) New Extensibility Accelerator for Functional Testing:

The new Extensibility Accelerator for Functional Testing is a Visual Studio-like IDE that facilitates the design, development, and deployment of Web Add-in Extensibility support.

It provides a user interface and special tools that help us define new test object classes, map those test object classes to the controls in our application, and teach QTP how to identify the controls, perform operations on the controls and retrieve their properties.

We install the Extensibility Accelerator from the Add-in Extensibility and Web 2.0 Toolkits option in the QTP Professional setup window.

Release Locked QTP Tests from QC

Execute the below Script,

Set QCConnection=QCUtil.QCConnection
Set con=QCConnection.command
con.CommandText=”DELETE FROM LOCKS WHERE LK_USER = ‘USERID’ ”
Set recset=con.execute

*Mention your QC USER ID in above code

***********************************************************************************************

you can find this info. in QC Site Configuration TAB (Use QC Admin login) , Lock_TimeOut option

Working on Windows Shell, Registy keys and TextUtil using QTP

Change the Registry Key Values:

‘f_WriteRegEdit(“HKCUControl PanelInternationalsShortDate”,datatable(“DateFormat”),”REG_SZ”)

Function f_WriteRegEdit(strKeyPath,strKeyVal,strValType)

Set WshShell = CreateObject(“WScript.Shell”)

WshShell.RegWrite strKeyPath, strKeyVal, strValType

End Function

msgbox f_ReadRegEdit(“HKCUControl PanelInternationalsShortDate”)

Function f_ReadRegEdit(strKeyPath)

Set WshShell = CreateObject(“WScript.Shell”)

f_ReadRegEdit=WshShell.RegRead (strKeyPath)

End Function


How to make QC Status incomplete, during script execution:

Reporter.ReportEvent micPass,”test”,”test”

Set WshShell = CreateObject(“WScript.Shell”)

WshShell.SendKeys “{F4}”

Reporter.ReportEvent micPass,”test”,”test”

——————————————————————————————————————————————

Window or Page  is not recognizing ???? you may use shell scripting and textutil.GetText to avoid such situations…

Let me know if you have any issues using the code…

Set WshShell = CreateObject(“WScript.Shell”)

WshShell.SendKeys “{TAB 1}”

WshShell.SendKeys “some data”

msgbox textutil.GetText(“1704986”)


VBScript code snippet to execute a Stored Procedure using ADO object

‘Connect to server to audit
Set MyProdServer = CreateObject(“ADODB.Connection”)
Set MyProdServerCMD = CreateObject(“ADODB.Command”)
Set MyProdServerRS = CreateObject(“ADODB.Recordset”)
MyProdServer.Provider = “sqloledb”
MyProdServer.ConnectionString = “server=” & sServerNameSource &
“;Database=admin;Trusted_Connection=yes;”
MyProdServer.Open
MyProdServerCMD.ActiveConnection = MyProdServer
MyProdServerCMD.CommandText = “sp_who3”
MyProdServerCMD.CommandType = adCmdStoredProc

Set MyProdServerRS = MyProdServerCMD.Execute

If MyProdServerRS.State = adStateClosed Then
logFile.WriteLine(“No results returned ” & Now())
Else

MyProdServerRS.MoveFirst
While MyProdServerRS.EOF = False
sSPID = MyProdServerRS(“SPID”)
sCmdText = MyProdServerRS(“CommandText”)
sLogin = MyProdServerRS(“Login”)
sHostName = MyProdServerRS(“HostName”)
sBlkBy = MyProdServerRS(“BlkBy”)
sDBName = MyProdServerRS(“DBName”)
sCommand = MyProdServerRS(“Command”)
sCPUTime = MyProdServerRS(“CPUTime”)
sDiskIO = MyProdServerRS(“DiskIO”)
sLastBatch = MyProdServerRS(“LastBatch”)
sProgramName = MyProdServerRS(“ProgramName”)
sSpid2 = MyProdServerRS(“SPID”)

Automation Test Development Strategy is simillar to SDLC process

For the projects who want to make automation testing 100% successful/robust, for the feasibility they have done… follow the below Software Automation Test Development Process [SATDP] with automated metrics/artifacts which should update the project status as and then at each phase, like resuable actions/functions/testscripts/OR/libs developed whom, when and what they developed and place the test results path in excel, better use Macros..
I will describe the process followed in each phase, soon…
  1. Automation Test Feasibility
  2. Automation Test Plan/Plan
  3. Analyse Manual TCs/ Analysis
  4. Test Script Designing/Design
  5. Test Script Development/Code
  6. Business Tests Run/Unit Test
  7. Integrate Business TestScripts,Functions and ReUsable Actions /Integration
  8. Code Optimization/Performation
  9. Batch Execution / Execute

Export/Copy the entire webtable from the webpage into Excelsheet, using Vb script

dim xl set xl=createobject(“Excel.Application”)
xl.workbooks.open “c:/book1.xls”
set nsheet=xl.sheets.item(1)
row=Browser(“browser”).page(“page”).webtable(“table”).getroproperty(“rows”) cols=Browser(“browser”).page(“page”).webtable(“table”).getroproperty(“cols”)
for i=0 to row-1
for j=0 to col-1
val=Browser(“browser”).page(“page”).webtable (“table”).getcelldata(i,j)
nsheet.cells(i,j)=val
next
next

—————————————————————————————–
Environment(“Peportpath”)=”C:Result.xls”
a=Browser(“Google”).Page(“Google”).WebTable (“index:=0”).GetROProperty(“outerhtml”)
Set FSO = CreateObject(“Scripting.FileSystemObject”)
Set WriteFile = FSO.CreateTextFile( Environment (“Peportpath”), True) writeFile.writeLine(a)
writeFile.close

Methods of Reading Data from EXCEL Sheet -Using VBScript

Method #1

Datatable.Importsheet “path of the excel file.xls”, source sheet ID/Name, desination sheet ID/Name
Datatable.SetCurrentRow(1)  ‘Read Value from First Row
value = datatable.Value(parameterName,Sheet ID/Name)

‘To Read Value from All the rows

Datatable.Importsheet “path of the excel file.xls”, source sheet ID/Name, desination sheet ID/Name
For vRow = 1 To Datatable.GetRowCount
Datatable.SetCurrentRow(vRow)
value = datatable.Value(parameterName,Sheet ID/Name)
Next

Method #2

Dim objexcel, objWorkbook, objDriverSheet, columncount, rowcount
set objexcel = Createobject(“Excel.Application”)
Set objWorkbook = objExcel.WorkBooks.Open(“path of the file.xls”)
Set objDriverSheet = objWorkbook.Worksheets(“name of the sheet / Id of the sheet”)
columncount = objDriverSheet.usedrange.columns.count
rowcount = objDriverSheet.usedrange.rows.count
for i = 1 to colunmcount
columnname = objDriversheet.cells(i,1)
if columnname = knowncolumnname then
for j = 1 to rowcount
fieldvalue = objdriversheet.cells(j,i)
next
end if
next

Method #3

Function GetDataFromDB (strFileName, strSQLStatement)

Dim objAdCon, objAdRs
Set objAdCon = CreateObject(“ADODB.Connection”)

objAdCon.Open “DRIVER={Microsoft Excel Driver (*.xls)};DBQ=”&strFileName & “;Readonly=True”
If Err <> 0 Then
Reporter.ReportEvent micFail,”Create Connection”, “[Connection] Error has occured. Error : ” & Err
Set obj_UDF_getRecordset = Nothing
Exit Function
End If

Set objAdRs = CreateObject(“ADODB.Recordset”)
objAdRs.CursorLocation=3                        ‘ set the cursor to use adUseClient – disconnected recordset
objAdRs.Open strSQLStatement, objAdCon, 1, 3

MsgBox objAdRs.fields(4).name
While objAdRs.EOF=false
For i=0 to objAdRs.Fields.count
Msgbox objAdRs.fields(i)
Next
objAdRs.moveNext
Wend

If Err<>0 Then
Reporter.ReportEvent micFail,”Open Recordset”, “Error has occured.Error Code : ” & Err
Set obj_UDF_getRecordset = Nothing
Exit Function
End If

Set objAdRs.ActiveConnection = Nothing

objAdCon.Close
Set objAdCon = Nothing

End Function

Example

Set rsAddin = GetDatasFromDB(“C:Documents and SettingsgrameshDesktopLogin.xls”, “Select * from [Login$]“)

VBScript to open excel spreadsheet, update cell, save then close

Set objExcel = CreateObject(“Excel.Application”)
‘Set objWorkbook = objExcel.Workbooks.Open(“C:test.xls”)
objExcel.Application.Visible = True
objExcel.Workbooks.Add
objExcel.Cells(1, 1).Value = “Test value”

objExcel.ActiveWorkbook.SaveAs “C:test.xls”
objExcel.ActiveWorkbook.Close
objExcel.Application.Quit

BPT running in an infinite loop, when using QTP 11 QC11

BPT’s running in an infinite loop? Going crazy trying to figure out the solution for it?

Its Patch QTP_00821

HP has just released a critical patch for people using QuickTest Professional 11 and ALM/QC 11.00 with BPT. The patch resolves an issue with settings that were setup for normal QTP test were sometimes incorrectly applied to a Business Process Test run. These setting caused the BPT to run in an infinite loop.

Patch QTP_00821 can be downloaded from HP.


Avoid system lock during Automation Test Script Execution

There are few ways to prevent windows to lock the system:

Way1:
Download the software Caffeine 1.4 and install on the machine where u run the scripts.

Way 2:
Create a .vbs file (with the below mentioned code) and a task in task scheduler

Const DELAY_MINUTES = 10

Wscript.Sleep DELAY_MINUTES * 60000
Do
CreateObject(“Wscript.Shell”).SendKeys “+”
Wscript.Sleep DELAY_MINUTES * 60000
Loop

Way 3:
Create a .vbs file (with the below mentioned code) and a task in task scheduler

Const micVoid = 0
Const micByte = 26
Const micLong = 3
Const KEYEVENTF_KEYUP = &H2
Set Extern = CreateObject("Mercury.ExternObj")
extern.Declare micVoid, "keybd_event", "user32", "keybd_event", micByte, micbyte, miclong, micLong
Extern.Declare micVoid, "Sleep", "kernel32", "Sleep", micLong
While True
extern.keybd_event 0, 0, KEYEVENTF_KEYDOWN, 0
Extern.Sleep 20000
Wend

-********************-*****************-*****************************-*********************************-*****************************
We can even run the scripts when the system is locked, but QTP may not replay constantly on a locked machine

The Quick Test Professional computer is locked or logged off.
Quick Test Professional was launched without permission to interact with the desktop.
The following registry key which enables you to run tests on a remote computer, even on an incompatible execution environment:
HKEY_CURRENT_USERSoftwareMercury InteractiveQuick Test ProfessionalMicTestSkipEnvironmentChecks

Set the registry key to 1 to prevent the remote execution checks, and 0 to perform the checks.

system lock during QTP Automation Test Script Execution

There are few ways to prevent windows to lock the system:

Way1:
Download the software Caffeine 1.4 and install on the machine where u run the scripts.

Way 2:
Create a .vbs file (with the below mentioned code) and a task in task scheduler

Const DELAY_MINUTES = 10

Wscript.Sleep DELAY_MINUTES * 60000
Do
CreateObject(“Wscript.Shell”).SendKeys “+”
Wscript.Sleep DELAY_MINUTES * 60000
Loop

Way 3:
Create a .vbs file (with the below mentioned code) and a task in task scheduler

Const micVoid = 0
Const micByte = 26
Const micLong = 3
Const KEYEVENTF_KEYUP = &H2
Set Extern = CreateObject("Mercury.ExternObj")
extern.Declare micVoid, "keybd_event", "user32", "keybd_event", micByte, micbyte, miclong, micLong
Extern.Declare micVoid, "Sleep", "kernel32", "Sleep", micLong
While True
extern.keybd_event 0, 0, KEYEVENTF_KEYDOWN, 0
Extern.Sleep 20000
Wend

-********************-*****************-*****************************-*********************************-*****************************
We can even run the scripts when the system is locked, but QTP may not replay constantly on a locked machine

The Quick Test Professional computer is locked or logged off.
Quick Test Professional was launched without permission to interact with the desktop.
The following registry key which enables you to run tests on a remote computer, even on an incompatible execution environment:
HKEY_CURRENT_USERSoftwareMercury InteractiveQuick Test ProfessionalMicTestSkipEnvironmentChecks

Set the registry key to 1 to prevent the remote execution checks, and 0 to perform the checks.

QTP Mercury Device Replay

In Order to use the DeviceReplay methods, you need to create DeviceReplay object.

Set objDeviceReplay = CreateObject(“Mercury.DeviceReplay”)

We use SendKeys method to send keyboard input/keystrokes to applications that dont have automation interface. We can also send more than one keystroke at a time using Sendkeys method. To send keystrokes x,y and z, you would send the string argument “xyz”.

Note: You cannot send Print Screen key to an application.

So, the difference between Mercury DeviceReplay and Sendkeys is

SendKeys -> Support only Keyboard Operations
DeviceReplay-> Support Keyboard + Mouse Operations like Drag Drop too.

In addition to that DeviceReplay supports sending multilingual characters and symbols, while sendkeys support limited keyboard operations.

The other operational difference is dependency on QTP software.

Mercury.DeviceReplay :- It comes with QTP as a module, so you need QTP on the system and only from QTP action you can use it.
SendKeys :- It could be used in VBS script to simulate keyboard inputs with native windows shell commands. It has no dependency on QTP as such.

Mercury DeviceReplay is a powerful utility to simulate keyboard input and also for simulating mouse clicks and movements. Under Java Add-in, you can find the DeviceReplay property. At times, Object.Set and Object.Type doesnt help in QTP for some applications. You can use Mercury DeviceReplay to type Non English symbols and letters even without changing the keyboard layout or installing the special fonts.

Methods

  1. MouseMove x, y                           {Move the mouse to the screen coordinate (x,y).}
  2. MouseClick x, y, button           {Move the mouse to the screen coordinate (x,y) and click the button}(0=left; 1=middle; 2=right).
  3. MouseDblClick x, y, button    {Move the mouse to the screen coordinate (x,y) and double-click the button}(0=left; 1=middle; 2=right).
  4. DragAndDrop x, y, dropx, dropy, button       {Drag the mouse from screen coordinate (x,y) to (dropx,dropy) with the button}(0=left; 1=middle; 2=right) pressed.
  5. PressKey key      {Press a key using the ASCII code of the key.}For example, Chr(13), vbCR and vbTab.
  6. MouseDown x, y, button    { Press the mouse button on screen coordinate (x,y).}
  7. MouseUp x, y, button     {Release the mouse button on screen coordinate (x,y).}
  8. KeyDown key                       {Press a key using the ASCII code of the key.}For example, Chr(13), vbCR and vbTab.
  9. KeyUp key                           {Release a key using the ASCII code of the key.}For example, Chr(13), vbCR and vbTab.
  10. SendString string             {Type a string.}

QTP Mercury Device Replay vs WScript SendKeys Method

In Order to use the DeviceReplay methods, you need to create DeviceReplay object.

Set objDeviceReplay = CreateObject(“Mercury.DeviceReplay”)

We use SendKeys method to send keyboard input/keystrokes to applications that dont have automation interface. We can also send more than one keystroke at a time using Sendkeys method. To send keystrokes x,y and z, you would send the string argument “xyz”.

Note: You cannot send Print Screen key to an application.

So, the difference between Mercury DeviceReplay and Sendkeys is

SendKeys -> Support only Keyboard Operations
DeviceReplay-> Support Keyboard + Mouse Operations like Drag Drop too.

In addition to that DeviceReplay supports sending multilingual characters and symbols, while sendkeys support limited keyboard operations.

The other operational difference is dependency on QTP software.

Mercury.DeviceReplay :- It comes with QTP as a module, so you need QTP on the system and only from QTP action you can use it.
SendKeys :- It could be used in VBS script to simulate keyboard inputs with native windows shell commands. It has no dependency on QTP as such.

Mercury DeviceReplay is a powerful utility to simulate keyboard input and also for simulating mouse clicks and movements. Under Java Add-in, you can find the DeviceReplay property. At times, Object.Set and Object.Type doesnt help in QTP for some applications. You can use Mercury DeviceReplay to type Non English symbols and letters even without changing the keyboard layout or installing the special fonts.

Out of Mercury DeviceReplay and SendKeys, which one should I use for Automation testing with QTP?

1. Depends on your objective like mouse operations & multilingual testing required.
2.In case of normal keyboard operations supported by both, SendKeys is easy to use due to English like syntax for keyboard input. Whereas for devicereplay you need to define user friendly names/constants (like VK_SHIFT etc) to numeric keycodes.

QTP Dot Net addin seems to have an issue with NET 4.0 applications.

Till .NET 3.5 and below, it was working fine. However, objects from .NET 4.0 application is showing a very strange behavior. Most of the objects are getting recognized as “SwfObjects”.

Till .NET 3.5 and below, we could get the hierarchy as:

SwfWindow(“…”).SwfButton(“…”)

After moving to .NET 4.0, we are getting hierarchy like this:

Window(“…”).SwfObject(“…”)

Now the question arises

Why SwfWindow objects are being viewed as Window. We have done the installation of .NET framework 4.0 very recently.

 The solution / answer goes like this:

The .NET Framework version 4.0 was installed after QuickTest Professional was installed which is the possible issue for this QTP behavior.

When you desire to work on .NET 4.0, then it’s better to firstly install this before the installation of QuickTest Professional. If .NET 4.0 is installed after QuickTest, then you need to register following two .NET DLL files as per the procedure given below.:

1. If working on a 64 bit operating system, you will be required to install patch QTP_00709.

2. Open a command prompt (Start > Run > type “cmd” > Click “Ok”)

3. Navigate toGlobalAssemblyCacheNet4

4. Run the following two commands:

1. ….binGACRegUtil4x86.exe -i Mercury.QTP.Agent.dll
2. ….binGACRegUtil4x86.exe -i Mercury.QTP.WpfAgent.dll

The above mentioned steps should fix this issue.

However, just in case if it doesn’t happen, we would recommend to carryout clean uninstalling of HP QuickTest Professional. 

Object Identification issue with IE8 and IE9 on QTP11.0

Tool: QTP 11.0
OS:  Windows 7
Browser: IE 9
General Issues: Objects are not recognised and IE gets hanged.
Solutions: Install patch QTPWEB_00078

Tool: QTP 11.0
OS:  Windows 7
Browser: IE 8

General Issues: Objects are not recognised for Web Application.
Solutions:
1. Right Click and run QTP as an Administrator and then try recording
or recognizing objects.
2. Open QTP, go to Record and Run Settings and navigate to the Web tab
and change the settings from a specific browser settings to ‘Record on
any open browser’ setting and then try recording or recognizing
objects.
Reason for not working:
a. QTP needs Admin level privileges to some of its files/registry
options to perform its functionality.
b. Windows 7 has bought in levels of security, your User ID on your
test PC might NOT have had all the admin level privileges.
c. To do one time setting by right clicking on QTP desktop shortcut
and select Properties. Navigate to Compatibility Tab and check the
option Run as Administrator.

Tool: QTP 10.0
OS:  Windows 7
Browser: IE 8
General Issues: Objects are not recognised.
Solutions:
1. Install following two patches
   a. For IE8.0 – qtpweb_00037.exe.
   You can download it from:
   http://support.openview.hp.com/selfsolve/document/KM743912
   Here is the description of the patch:
   ========================================================================
   HP QuickTest Professional 10.00 Patch QTPWEB_00037
   (c) Copyright 2009 Hewlett-Packard Development Company, L.P.
   ========================================================================
   QTPWEB_00037 – Support for Internet Explorer 8
   ========================================================================
   This patch provides official support for testing Web applications
in Internet Explorer 8.
   It includes support for working with Internet Explorer 8 on all
operating systems that QuickTest Professional supports.
   (For the complete list, see the QuickTest Professional 10.00 Readme.)

   b. For Windows 7.0 – qtp_00644.exe.
2. Try the below settings:
   a. IE: Select the “Enable 3rd party extensions” option under Tools
–> Advanced section in IE
   b. Open Control Panel, choose User Accounts and Family Safety >>
System and Security Settings>>Change User Account Control
settings>>Set the control to ‘Never notify’ and restart the computer.

Tool: QTP 9.5
OS:  Windows 7
Browser: IE 8

General Issues: IE 8 gets crash.
Solutions: Uncheck ‘ActiveX add-in’ when launching QTP 9.5 will work
file with IE 8.
Note: Official Support for IE8 is QTP 10.0 with Patch QTPWEB_00037.

QTP Object Identification issue with IE8 and IE9 on QTP11.0

Tool: QTP 11.0
OS:  Windows 7
Browser: IE 9
General Issues: Objects are not recognised and IE gets hanged.
Solutions: Install patch QTPWEB_00078

Tool: QTP 11.0
OS:  Windows 7
Browser: IE 8

General Issues: Objects are not recognised for Web Application.
Solutions:
1. Right Click and run QTP as an Administrator and then try recording
or recognizing objects.
2. Open QTP, go to Record and Run Settings and navigate to the Web tab
and change the settings from a specific browser settings to ‘Record on
any open browser’ setting and then try recording or recognizing
objects.
Reason for not working:
a. QTP needs Admin level privileges to some of its files/registry
options to perform its functionality.
b. Windows 7 has bought in levels of security, your User ID on your
test PC might NOT have had all the admin level privileges.
c. To do one time setting by right clicking on QTP desktop shortcut
and select Properties. Navigate to Compatibility Tab and check the
option Run as Administrator.

Tool: QTP 10.0
OS:  Windows 7
Browser: IE 8
General Issues: Objects are not recognised.
Solutions:
1. Install following two patches
   a. For IE8.0 – qtpweb_00037.exe.
   You can download it from:
   http://support.openview.hp.com/selfsolve/document/KM743912
   Here is the description of the patch:
   ========================================================================
   HP QuickTest Professional 10.00 Patch QTPWEB_00037
   (c) Copyright 2009 Hewlett-Packard Development Company, L.P.
   ========================================================================
   QTPWEB_00037 – Support for Internet Explorer 8
   ========================================================================
   This patch provides official support for testing Web applications
in Internet Explorer 8.
   It includes support for working with Internet Explorer 8 on all
operating systems that QuickTest Professional supports.
   (For the complete list, see the QuickTest Professional 10.00 Readme.)

   b. For Windows 7.0 – qtp_00644.exe.
2. Try the below settings:
   a. IE: Select the “Enable 3rd party extensions” option under Tools
–> Advanced section in IE
   b. Open Control Panel, choose User Accounts and Family Safety >>
System and Security Settings>>Change User Account Control
settings>>Set the control to ‘Never notify’ and restart the computer.

Tool: QTP 9.5
OS:  Windows 7
Browser: IE 8

General Issues: IE 8 gets crash.
Solutions: Uncheck ‘ActiveX add-in’ when launching QTP 9.5 will work
file with IE 8.
Note: Official Support for IE8 is QTP 10.0 with Patch QTPWEB_00037.

QTP VB Script Class Object Example

Class User

‘ declare private class variable
Private m_userName

‘ declare the property
Public Property Get UserName
UserName = m_userName
End Property

Public Property Let UserName (strUserName)
m_userName = strUserName
End Property

‘ declare and define the method
Sub DisplayUserName
Response.Write UserName
End Sub

End Class

‘After you have declared your Class, then, as demonstrated below, you may create an instance of that Class (i.e., object) using Set and New.

‘Use of Class
Dim objUser
Set objUser = New User

‘ set the UserName property
objUser.UserName = “The Guru”

‘ call the DisplayUserName method
‘ to print the user name
objUser.DisplayUserName


Output:
“The Guru”

Designing QTP Framework

What is framework?
Automation Framework is a set of guidelines and process you use to manage and optimize your automation testing. In simple words, Framework is a way to do the things in fashioned and organized manner! Framework is nothing but a concept.

It’s always possible to work without framework but you’ll be doing a lot of rework, everything will be here & there and in most of the time you will end-up with a mess, specially in the large projects.

Framework lets you predefine your automation plans, strategies and how you are going to proceed.

Types of Framework:
Framework can be of several types, but here are three main types of frameworks-
1. Keyword driven framework
2. Data driven framework
3. Hybrid framework
But this is only theoretical. Practically, there is no ‘Chinese Wall’ between the framework types.
In every organization you work, you’ll find that it’s quite different from the other and not only on organization level, you can feel the difference within different projects!
Yess, but most of the them could be mapped with Hybrid type and I like it!! 🙂
Hybrid framework has no boundaries and open to take benefit of all possible type of frameworks.

How to design a framework?
I have done a lot of automation projects and designed a lot a frameworks, but seriously guys, I never used any particular type of framework!

Practically, every application/project has its own expectation. You just need to start your work in organized way and believe me friends, at the end of the day; your framework will be ready automatically!! Sounds crazy??
You can’t design a complete framework and then start automation! You start automation and framework will start building simultaneously.

The first step of any test automation framework is to do a quick POC with few high priority test cases. By doing POC, you will identify the object identification issues, challenges, complexities, required test-data and limitation you have. Once you are ready with this information, you can proceed with next steps. On the basis of above information, you can decide what type of framework is most suitable to you.

But before starting, you must take some time to decide your strategies about..

1. Object Identification
2. Test-Data
3. Function Library
4. Error Handling
5. Controller script
6. Documents and Manuals
1. Object Identification:
How to identify objects i.e. using Object Repository or Descriptive programming or both. As per my understanding, dont’t try to stick on one particular. Depending on the application/object types, mixed approach is most fruitful most of the time.
2. Test-Data:
How to manage you data? DataTable or Excel or may be flat/csv files.
3. Function Library:
Be clear about what type of function libraries you are going to use and why.
4. Error Handling:
Whets your plan to handle errors? Be clear about it.
5. Controller script:
Design a controller script, which will control all your automation. It should be neat. This helps to understand what actually you are going to call.
6. Documents and Manuals:

Keep all the documentation, user guide/manuals, keywords descriptions here.

Create different folder for the these six things and keep data in folders accordingly.

This was the one part.

Apart from this, from first day of your automation, keep only one thing in your mind.. follow general good practices!
Here are are few points need to be take care in designing successful framework.
  • Try to document each and every thing, as much as you can! like comments in script, modification etc.
  • Don’t stick with any particular object identification, use mix of OR and DP
  • While using OR, don’t use record and playback, just add object in the object repository and code the script manually.
  • Follow proper Naming-Conventions for all your variables, functions, files.
  • Define all the variables in you scripts, use Option Explicit.
  • Try to keep you functions small to enhance reusability and portability.
  • Never hard code any data in the scripts, use parametrization.
  • Take regular back-up of your work.

QTP 11.0 Key Features Enhanced

The key enhancements in QTP 11.0 include the following:

1) Support for new Operating Systems:
QTP 11.0 has added new support for the following operating systems:

a) Windows 7

b) Windows Vista SP2

c) Windows Server 2008 SP2

d) Windows Server 2008 R2

2) Enhanced Data Management Facility:
QTP is now seamlessly integrated with HP ALM (Application Lifecycle Management) software. Quality Center (HP ALM) test configuration functionality enables us to determine at runtime which data sets to use for our tests.

ALM test configurations enable us to:

a) Unbind our data from our tests

b) Share common data sources across different tests

c) Filter our data to fit our testing needs

d) Increase requirements traceability

e) We store the data for our tests in the Quality Center Test Resources module in the form of data table resource files.

We can then define multiple test configurations for a test in the Test Plan module. When working with data-driven QTP tests in HP ALM, each configuration is a QTP test that is set to run with a selected data resource file and optional data filter settings.

One or more specific configurations of the test can be included in a Test Set to cover different parts of a requirement or to cover multiple requirements.

By using Quality Center test configurations, we can create more generic tests and reuse them by associating a different set of data with each. We can also reuse our data by associating the same data table file with multiple tests.

3) New Object Spy Functionality:
The Object Spy has the following new features:

a) Add an object to a repository: We can now add an object to the object repository directly from the Object Spy.

b) Highlight an object in our application: When we select a test object in the Object Spy Object hierarchy tree, we can then select to highlight the object in our application that corresponds to that test object.

c) Copy/paste object properties: We can copy the identification properties and values of a selected test object in the Object Spy and paste the details into any document. The details are formatted in programmatic description syntax. This option is especially useful if we want to compare the properties and values of two objects in our application or when creating programmatic descriptions.

Additionally, the Object Spy has a new, cleaner look and feel:

4) New Smart Regular Expression list:
The Smart Regular Expression list provides syntax hints that make it easier than ever to insert regular expressions into our test steps. It also enables us to access the Regular Expression Evaluator, which lets us test regular expressions to make sure they suit our needs.

5) New QTP-Service Test integration facility:
Now we can test our GUI and UI-Less Application Functionality in One Test. We can use QTP steps to start testing the GUI elements in our application, then call a Service Test test to validate service communications (standard Web Services, non-SOAP Web Services, such as REST, etc.), and then step back into our QTP GUI testing, all in a single test run.

The results of the QTP and Service Test steps are displayed in a unified report in the new Run Results Viewer.

6) New Run Results Viewer:
The new Run Results Viewer provides an Executive Summary page with summary data, pie charts and statistics for both the current and previous runs, a quick link to the previous run results, and more.

The Run Results Viewer displays the results of our run session in a set of panes that we can show, hide, move, dock, and otherwise customize to our needs.

We can install the Run Results Viewer as a standalone installation. This enables us to share the results of our tests with business analysts and developers who do not work with QTP.

7) New facility to hide the Keyword View:
If we prefer working only with the Expert View, we can now use an option in the Options dialog box to hide the Keyword View so that only the Expert View is displayed when we open QTP Professional.
8) Facility to add Images to Our Run Results:
We can now add a Reporter.ReportEvent statement that includes an image file path. This lets us add an image to the run results wherever one is needed.

9) New Log Tracking Functionality:
QTP’s new Log Tracking functionality helps us work with developers to pinpoint the root causes of unexpected behavior in our application.

When we enable log tracking, QTP receives the Java or .NET log framework messages from our application and embeds them in the run results.

We can click a log message in the results to jump to the relevant step in the run results tree, or we can click a step in the run results tree and view the log message that was generated at the time that the selected step ran. We can also specify that a log message of a particular level (or higher) will fail our test.

After we view the results, we can print or export the log tracking details to a file to show to a developer, or we can provide the developer with the standalone Run Results Viewer installation so that the developer can view and analyze the results directly on his or her own desktop.

10) Automatic Parameterization of Steps:
We can instruct QTP to automatically parameterize the steps in our test’s actions at the end of a recording session.

This enables us to create actions that can be used for a variety of different purposes or scenarios by referencing different sets of data.

We activate this option by selecting the Automatically parameterize steps option in the General tab of the Options dialog box. We can set the option to use Global Data Table Parameters or Test Parameters.

When we stop a recording session while this option is selected, QTP replaces the constant values in the test object operation arguments of our steps with either Data Table parameters or action parameters, based on our selection in the Options dialog box.

QTP performs this automatic parameterization for all relevant steps in any action in our test, in which we recorded one or more steps during that recording session.

If we work with HP ALM, and we select the Global Data Table Parameters option, we can map the generated parameters to the column names of a data resource and then use different configurations in our test sets.

11) New Visual relation identifiers:
We can now use visual relation identifiers to identify application objects based on other objects that are always near them.

This enables us to create a more reliable identification definition for test objects that are otherwise difficult to differentiate, and to ensure that the identification remains reliable even if the user interface design changes.

The Visual Relation Identifier Dialog Box provides the interface and tools to help us create and verify our visual relation identifier definitions.

12) Visual indication of Version Control Status of Tests:
If we are working with version control in HP ALM or Quality Center, QTP provides a visual indication to show us when an asset is checked into or out of a project.

Tests, components, and function libraries that are part of version controlled projects stored in HP ALM or Quality Center display an icon and/or text in the title bar, indicating their version control status.

13) Web 2.0 add-ins support:
QTP 11.0 provides Web Add-in Extensibility-based add-ins for ASP .NET Ajax, GWT, Yahoo UI, and Dojo Web 2.0 toolkits.

We can use these add-ins just as we would any other add-in. We can also use Web Add-in Extensibility or Extensibility Accelerator to customize the provided support to match our needs.

We install these add-ins by running the Web 2.0 Toolkit Support Setup from the Add-in Extensibility and Web 2.0 Toolkits option in the QTP setup window.

The operations supported for each Web 2.0 test object class are a combination of custom operations developed for that test object class and operations directly inherited from the corresponding (base) Web Add-in test object class.

14) New capabilities for working with Web-Based objects:
Following new testing capabilities are now available handling Web-Based objects.

a) Firefox Testing: Us can now record steps on Mozilla Firefox and use the.Object property to access the Firefox DOM.

b) XPath, CSS, Identifiers: Us can add the XPath or CSS identifier properties to instruct QTP to identify a Web object in our application based on its XPath location or CSS definition.

c) Event Identifiers: Us can also now use the attribute/* notation in the test object description to identify a Web-based object based on an event associated with that object. For example, us can add attribute/onClick as a property in a WebButton test object description to identify a button that is associated with the onClick event.

d) Embed or Run JavaScripts in our Web Pages: We can use the new EmbedScript/EmbedScriptFromFile and RunScript/RunScriptFromFile functions to embed JavaScripts in all loaded browser pages and frames or to run JavaScripts in specific pages. Use these scripts to perform operations on, or retrieve data from, the browser pages in our application.

15) New methods for testing Web-based Operations:
The following methods are available to test Web-based applications:

a) AnyWebBasedObject.RightClick / MiddleClick

b) Brower.ClearCache

c) Browser.DeleteCookies

16) New LoadFunctionLibrary statement:
The new LoadFunctionLibrary statement lets us load a function library when a step runs instead of at the beginning of a run session. This means, for example, that us can define conditional steps that use functions from various function libraries, but load only the required function libraries during a run session.

17) Improved checkpoints and output value objects management:
We can now manage checkpoints and output value objects when comparing, merging, and exporting object repositories just like any other test object, including filtering, searching, and conflict resolution.

18) Dual Monitor Support:
QTP recognizes objects across multiple monitors, meaning that our application display no longer needs to be limited to one screen. Alternatively, we can view QTP on one monitor while the steps run on our application on another monitor.

19) New QTP Asset Upgrade Tool for HP ALM and Quality Center:
The QTP Asset Upgrade Tool for HP ALM/Quality Center enables us to upgrade, in a batch, all the QTP assets in an HP ALM or Quality Center 10.00 project from QTP 9.5 or earlier to the current format and to convert testing document attachments to the resources and dependencies model.

The QTP Asset Upgrade Tool for HP ALM/Quality Center also enables us to upgrade our tests to use the new test configurations feature. If our tests contain data table parameters that are stored in the Global sheet of a QTP data table, this tool copies those data table parameters to our HP ALM or Quality Center project, enabling us to start working with HP ALM test configurations.

20) Test execution in minimized remote desktop protocol session:
We can now run QTP in a minimized RDP (remote desktop protocol) session in an RDP 6.0 or later client by setting a registry value on the remote computer.

21) Improved Web Add-in Extensibility:
We can now develop browser-independent Web Add-in Extensibility support sets that support testing custom controls on both Internet Explorer and Firefox, and on different versions of these browsers.

We can introduce external JavaScript libraries in our Web Add-in Extensibility support sets, enabling us to call their functions from within the JavaScript functions we develop to support custom controls.

QTP’s performance when learning, spying, and running steps on controls supported by Web Add-in Extensibility is improved.

22) Improved Business Process Testing:
QTP 11.0 provides the following enhancements for business process testing when working with HP ALM:

# Improved performance.

# Application areas are now stored in the HP ALM Test Resources module as resources.

This enables us to apply version control to an application area, view at a glance which components are using a specific application area, see which resource files are associated with a particular application area, share our application areas with other projects, and so on.

# Local system monitoring is now supported for component runs.

# All component parameters in HP ALM are now inserted as string value types. From HP ALM, we can use options to encrypt these parameter values or to apply dynamic date values.

23) New QTP-Service Test integration Facility:
The new QTP-Service Test integration enables us to test across the GUI and non-GUI layers of our application.

We can use QTP steps to start testing the GUI elements in our application, then call a Service Test to validate service communications (standard Web Services, non-SOAP Web Services, such as REST, etc.), and then step back into our QTP GUI testing, all in a single test run.

The results of the QTP and Service Test steps are displayed in a unified report in the new Run Results Viewer.

24) New Extensibility Accelerator for Functional Testing:

The new Extensibility Accelerator for Functional Testing is a Visual Studio-like IDE that facilitates the design, development, and deployment of Web Add-in Extensibility support.

It provides a user interface and special tools that help us define new test object classes, map those test object classes to the controls in our application, and teach QTP how to identify the controls, perform operations on the controls and retrieve their properties.

We install the Extensibility Accelerator from the Add-in Extensibility and Web 2.0 Toolkits option in the QTP Professional setup window.

QTP Framework Designing

What is framework?
Automation Framework is a set of guidelines and process you use to manage and optimize your automation testing. In simple words, Framework is a way to do the things in fashioned and organized manner! Framework is nothing but a concept.

It’s always possible to work without framework but you’ll be doing a lot of rework, everything will be here & there and in most of the time you will end-up with a mess, specially in the large projects.

Framework lets you predefine your automation plans, strategies and how you are going to proceed.

Types of Framework:
Framework can be of several types, but here are three main types of frameworks-
1. Keyword driven framework
2. Data driven framework
3. Hybrid framework
But this is only theoretical. Practically, there is no ‘Chinese Wall’ between the framework types.
In every organization you work, you’ll find that it’s quite different from the other and not only on organization level, you can feel the difference within different projects!
Yess, but most of the them could be mapped with Hybrid type and I like it!! 🙂
Hybrid framework has no boundaries and open to take benefit of all possible type of frameworks.

How to design a framework?
I have done a lot of automation projects and designed a lot a frameworks, but seriously guys, I never used any particular type of framework!

Practically, every application/project has its own expectation. You just need to start your work in organized way and believe me friends, at the end of the day; your framework will be ready automatically!! Sounds crazy??
You can’t design a complete framework and then start automation! You start automation and framework will start building simultaneously.

The first step of any test automation framework is to do a quick POC with few high priority test cases. By doing POC, you will identify the object identification issues, challenges, complexities, required test-data and limitation you have. Once you are ready with this information, you can proceed with next steps. On the basis of above information, you can decide what type of framework is most suitable to you.

But before starting, you must take some time to decide your strategies about..

1. Object Identification
2. Test-Data
3. Function Library
4. Error Handling
5. Controller script
6. Documents and Manuals
1. Object Identification:
How to identify objects i.e. using Object Repository or Descriptive programming or both. As per my understanding, dont’t try to stick on one particular. Depending on the application/object types, mixed approach is most fruitful most of the time.
2. Test-Data:
How to manage you data? DataTable or Excel or may be flat/csv files.
3. Function Library:
Be clear about what type of function libraries you are going to use and why.
4. Error Handling:
Whets your plan to handle errors? Be clear about it.
5. Controller script:
Design a controller script, which will control all your automation. It should be neat. This helps to understand what actually you are going to call.
6. Documents and Manuals:

Keep all the documentation, user guide/manuals, keywords descriptions here.

Create different folder for the these six things and keep data in folders accordingly.

This was the one part.

Apart from this, from first day of your automation, keep only one thing in your mind.. follow general good practices!
Here are are few points need to be take care in designing successful framework.
  • Try to document each and every thing, as much as you can! like comments in script, modification etc.
  • Don’t stick with any particular object identification, use mix of OR and DP
  • While using OR, don’t use record and playback, just add object in the object repository and code the script manually.
  • Follow proper Naming-Conventions for all your variables, functions, files.
  • Define all the variables in you scripts, use Option Explicit.
  • Try to keep you functions small to enhance reusability and portability.
  • Never hard code any data in the scripts, use parametrization.
  • Take regular back-up of your work.

Problems with QTP 11 Installation

Notes and Limitations

This section includes the following:

  • Before You Install
  • Supplemental Information

Before You Install

This section includes information that is important for you to know before you install QuickTest.

  • You cannot install QuickTest when a McAfee Anti-Virus application is running.

Workaround: Disable the antivirus application during the QuickTest installation process.

  • QuickTest Professional supports the Sentinel RMS License Manager version 8.3.0 as its concurrent license server. Earlier versions of the concurrent license server are not supported.

  • QuickTest does not support Windows user names with non-English letters. If you log in to Windows using a user name (with administrative privileges) that contains non-English characters and then install QuickTest, the installation may complete successfully, but you may not be able to open QuickTest or it may not behave correctly.

  • The path in which installation files for QuickTest are located, and the path in which QuickTest is installed, can contain only English characters.

  • When upgrading to QuickTest 11.00 from a QuickTest 9.5 or 10.00 installation on which a Language Pack (localized version of QuickTest) was previously installed, you may get an error message when opening QuickTest after the upgrade.

Workaround: Repair the installation:

  • In the Control Panel, select Add/Remove Programs and select the HP QuickTest Professional entry.

  • Click the Change button.

  • In the installation wizard that opens, choose the Repair option and follow the on-screen instructions.

  • If you install QuickTest 11.00 while the QTPNET_00015 patch (a QuickTest 10.00 patch) is installed on your computer, QuickTest may behave unexpectedly.

Workaround:

  • Open the Add/Remove Programs dialog box from the Control Panel.

  • Display the installed patches by selecting the Show updates check box (or click the View Installed Updates button, depending on your operating system version.)

  • Locate HP QuickTest Professional in the list and check whether QTPNET_00015 for HP QuickTest Professional 10.00 QFE is listed as an installed update.

  • If it is installed, click Remove to uninstall this patch before you install QuickTest 11.00.

  • If you want to work with .NET 4.0, it is best to install it before you install QuickTest. If you install .NET 4.0 after you install QuickTest, you must manually register two .NET DLLs as follows:

In <QuickTest installation folder>GlobalAssemblyCacheNet4, execute the following commands:

  • ….binGACRegUtil4x86.exe -i Mercury.QTP.Agent.dll

  • ….binGACRegUtil4x86.exe -i Mercury.QTP.WpfAgent.dll

  • In Windows XP and Windows 2003, if you install the Oracle Add-in, the Windows Remote Shell Service (rshsvc.exe) may fail and display an error message every time you restart the computer. This occurs only if the Remote Shell Service is configured to run automatically.

Supplemental Information

Use the information in this section as a supplement to the product documentation.

Additional troubleshooting information, guidelines, and feature-specific limitations are described in the relevant locations of the installation and product documentation. Make sure you are aware of those issues when working with the relevant features.

This section includes the following:

Installation

  • When you install a new QuickTest 11.00 installation and you specify a single concurrent license server in the License Wizard, QuickTest now automatically specifies the server in an LSFORCEHOST environment variable, to optimize performance. However if you perform an upgrade from QuickTest 10.00, and you already had an LSHOST variable defined, the upgrade installation does not change the setting to LSFORCEHOST.

Workaround: If desired, set the LSFORCEHOST variable manually, as described in the HP Functional Testing Concurrent License Server Installation Guide.

  • If you manually set an LSHOST environment variable to a particular server (or upgrade from a previous version of QuickTest where the LSHOST variable was set), QuickTest sometimes gets its license from another server, even when the specified server has the required licenses available.

Workaround: To ensure that a specific server will be used, specify an LSFORCEHOST environment variable instead.

Operating Systems

If you work with QuickTest on a Windows 7 operating system with User Account Control (UAC) turned on, and you open a test from a protected location (such as Program Files), it is opened in read-only mode and a message is displayed that you do not have permissions to open it in read-write mode.

General

  • When you save a test using the Save Test with Resources option, it also saves any tests containing called external actions. However, to preserve space, these called tests contain only the called actions, and not all of the actions from the original test. Therefore, you cannot open these called tests in QuickTest from the local copy.

Workaround: If you need to have full access to the called tests as well as the main test that you save using the Save Test with Resources option, then you must manually save all required tests locally and then manually edit all references to the relevant actions from the main test to the actions it calls.

Web Add-in

  • The If Handler option in the Web Event Recording Configuration dialog box works on Mozilla Firefox browsers only if the handler is assigned as an attribute (for example, <A onclick = “some code”/>) and not if it is assigned as a property (for example, aObj.onclick = function() {some code})

Silverlight Add-in

  • When Silverlight applications are opened in two tabs sequentially (without QuickTest performing any operations on the first one before the second opens), QTP will use a custom server to support controls only in the first application with which you interact. The same is true when two tabs are refreshed sequentially.

Workaround: Perform an operation (for example, use the Object Spy) with the first tab opened/refreshed before opening/refreshing the second one.

  • If a Web page contains a Silverlight application that is windowless and is scrolled out of view when the page opens the first time, QuickTest will not be able to make this application visible. (For example, in this scenario, QuickTest will not be able to perform an SlvWindow.MakeVisible step).

Quality Center and Business Process Testing

  • When comparing two baselines, if the only change in a resource is its association to a test or component, the Asset Comparison Tool does not indicate any change in the resource even though HP ALM or Quality Center may indicate that the resource is Modified.

  • If an HP ALM or Quality Center user manually changes the status of a test instance run, HP ALM/Quality Center creates something called fast run results to record the change of the test status. The fast run results are not valid QuickTest run results files. However, when you try to select results to open or delete in the Run Results Viewer or Run Results Deletion tool, the fast run results are available in the list.

  • After you run a component locally in QuickTest, you cannot use the Jump to Step in QuickTest option from the Run Results Viewer.

  • You cannot perform a remote execution of a business process test on a Windows 2008 R2 QuickTest computer.

Documentation

  • The QuickTest Help Index tab contains only reference items, such as objects, methods, properties, and functions. It does not contain any entries from the user guides.

To search for information from all the documents in the QuickTest Documentation Library, use the Search tab.

  • On some operating systems or after installing certain Windows service packs or updates, you may not be able to view the content of some Help files.

Workaround:

  • Right-click the CHM file in <QTP installation folder)help, and click Properties.

  • In the dialog box that opens, click Unblock.

For details, see http://support.microsoft.com/kb/902225

Internationalization

  • If you are working with a QuickTest User Interface Pack, install it before running QuickTest for the first time, if possible.

If you install a QuickTest User Interface Pack after running QuickTest, the following items may remain in English after installing the User Interface Pack:

  • Menus and toolbars in the Object Repository window (in QuickTest or in the Object Repository Manager)

  • The Find dialog box in the Expert View

Workaround: Close QuickTest and delete the folder: %APPDATA%HPQuickTest Professional
(For example, C:Documents and Settings<username>Application DataHPQuickTest Professional).

  • When working on an operating system using a Spanish locale, you may get an assertion error message at the beginning of the QuickTest installation.

Workaround: Modify the sLanguage registry key value as follows:

  • In the Start > Run dialog box, type: regedit.

  • Go to the registry path: HKEY_CURRENT_USERControl PanelInternational

  • Change the sLanguage value from ES to ESN

  • If the above steps do not solve the problem, restart your computer and try again.

Run the QuickTest installation again.

  • Selecting the View Sample Snapshot option in the QuickTest Asset Comparison Tool opens a window containing a sample image of the selected element in QuickTest. The image displays the English user interface.

  • The Add-in Extensibility SDKs are not localized.

Working with Windows Registry’s Using DontNetFactory object

‘Creating the .Net Computer object

Set obj = DotNetFactory(“Microsoft.VisualBasic.Devices.Computer”,”Microsoft.VisualBasic”)

Set Registry = obj.Registry

IEPathKey = “HKEY_LOCAL_MACHINESOFTWAREMICROSOFTWINDOWSCURRENTVERSIONAPPPATHSIEXPLORE.EXE”

‘Display the path of IE from Registry

Msgbox “Internet Explorer Location – ” & Registry.GetValue(IEPathKey,””,””)

Registry.SetValue “HKEY_CURRENT_USERSoftwareMyApp”, “Path”, “C:Test.exe”

How to Ping an IP Address using DoNetFactory

‘Creating the .Net Computer object

Set obj = DotNetFactory(“Microsoft.VisualBasic.Devices.Computer”,”Microsoft.VisualBasic”)

blnPingSuccess= ob.Ping(“127.0.0.1”)

Msgbox fnCheckResponse(“blnPingSuccess”,”Ping was Successful”,”Ping ws Unsuccessful”)

‘Wait for 5 Secs

blnPingSuccess = obj.Ping(“127.0.0.1”,5000)

Set obj = Nothing


Public Function fnCheckResponse(condition, string1, string2)

If Condition Then

fnCheckResponse =string1

Else

fnCheckResponse =string2

End If

End Function

QTP Working with Windows Registry Using DontNetFactory object

‘Creating the .Net Computer object

Set obj = DotNetFactory(“Microsoft.VisualBasic.Devices.Computer”,”Microsoft.VisualBasic”)

Set Registry = obj.Registry

IEPathKey = “HKEY_LOCAL_MACHINE\SOFTWARE\MICROSOFT\WINDOWS\CURRENTVERSION\APPPATHS\IEXPLORE.EXE”

‘Display the path of IE from Registry

Msgbox “Internet Explorer Location – ” & Registry.GetValue(IEPathKey,””,””)

Registry.SetValue “HKEY_CURRENT_USER\Software\MyApp”, “Path”, “C:\Test.exe”

Visual Relation Identifier in QTP 11.0

Visual Relation Identifiers will provide a method to identify a object based on the neighbour object identification properties. This works to the power while working with webtable class in web based applications. We can define the visual relationship identifiers, which can be set in both local and shared object repositories.

How Visual Relation Identifiers Work:

If you want to identify and click on a class ‘WebCheckBox’ present in the same row where the main identifier ‘employee ID’ WebElement is present. Add the employee ID WebElement to QTP object repository, and add one ‘WebCheckBox’ class object without any identifications properties. Click on the visual relation identifiers button and provide and select relation details (left and check the horizontal checkbox and click on ‘OK’ button. Now drag the ‘WebElement’ class into QTP IDE and execute the statement, it will check the desired check beside that expected ‘Employee ID’.

It identifies the object based the related object we map to the VRI object, we can specify the 3 different relational details to the both objects based on its position: Left/Right (or) Above/Below (or) Closest to X, Y/both axis.

Video:

http://h20621.www2.hp.com/video-gallery/us/en/c3505a334636ac1caa92798d2ab15c85c60b0ca4/r/video


Using Descriptive Progamming:

Set rc = VisualRelations.Create
Set relation = rc.Add
relation.relatedobjectpath = "Browser(""micclass:=Browser"").Page(""micclass:=Page"").WebElement(""innertext:=Art"",""html tag:=LABEL"",""index:=0"")"
relation.relativeposition = micRelRight
relation.setargument micrelinline, True

Set des=Description.Create
des.Add "micclass","WebCheckBox"
des.Add "visual relations",rc

Browser("micclass:=Browser").Page("micclass:=Page").WebCheckbox(des).highlight
Set relation = Nothing
Set rc=Nothing

QTP 11 Visual Relation Identifier

Visual Relation Identifiers will provide a method to identify a object based on the neighbour object identification properties. This works to the power while working with webtable class in web based applications. We can define the visual relationship identifiers, which can be set in both local and shared object repositories.

How Visual Relation Identifiers Work:

If you want to identify and click on a class ‘WebCheckBox’ present in the same row where the main identifier ‘employee ID’ WebElement is present. Add the employee ID WebElement to QTP object repository, and add one ‘WebCheckBox’ class object without any identifications properties. Click on the visual relation identifiers button and provide and select relation details (left and check the horizontal checkbox and click on ‘OK’ button. Now drag the ‘WebElement’ class into QTP IDE and execute the statement, it will check the desired check beside that expected ‘Employee ID’.

It identifies the object based the related object we map to the VRI object, we can specify the 3 different relational details to the both objects based on its position: Left/Right (or) Above/Below (or) Closest to X, Y/both axis.

This identification property helps in solving most of the object identification issues in webtable using QTP and of not demanding much technical knowledge pushing automation to next level.

QTP – VB Script Interview Sample Questions and Answers

‘1    Print Hello World
Print “Hello World”
‘**************************************************************************
‘**************************************************************************
‘2    Find whether given number is a odd number
Dim oNumber

oNumber=4
If oNumber mod 2 <>0 Then
Print “The Number “& oNumber &” is an Odd Number”
else
Print “The Number “& oNumber &” is not an Odd Number”
End If
‘**************************************************************************
‘**************************************************************************
‘3    Print odd numbers between given range of numbers

Dim RangeStart
Dim RangeEnd
Dim iCounter
RangeStart=10
RangeEnd=20

For iCounter=RangeStart to RangeEnd

If iCounter mod 2 <>0 Then
Print  oNumber
End If

Next

‘**************************************************************************
‘**************************************************************************
‘4    Find the factorial of a given number
Dim oNumber
Dim iCounter
Dim fValue

oNumber=6
fValue=1

For iCounter=oNumber to 1 step-1
fValue=fValue*iCounter
Next
print  fValue

‘**************************************************************************
‘**************************************************************************
‘5    Find the factors of a given number
Dim oNumber
Dim iCounter

oNumber=10

For iCounter=1 to oNumber/2
If oNumber mod iCounter=0 Then
print iCounter
End If
Next
print oNumber
‘**************************************************************************
‘**************************************************************************
‘6    Print prime numbers between given range of numbers

Dim RangeStart
Dim RangeEnd
Dim iCounter
RangeStart=1
RangeEnd=30

For iCounter=RangeStart to RangeEnd

For iCount=2 to round(iCounter/2)
If iCounter mod iCount=0 Then
Exit for
End If
Next

If iCount=round(iCounter/2)+1 or iCounter=1 Then
print iCounter
End If
Next

‘**************************************************************************
‘**************************************************************************
‘7    Swap 2 numbers with out a temporary variable

Dim oNum1
Dim oNum2

oNum1=1055
oNum2=155

oNum1=oNum1-oNum2
oNum2=oNum1+oNum2
oNum1=oNum2-oNum1
print oNum1
print oNum2
‘**************************************************************************
‘**************************************************************************
‘8    Write a program to Perform specified Arithmetic Operation on two given numbers
Dim oNum1
Dim oNum2
Dim oValue

oNum1=10
oNum2=20

OperationtoPerform=”div”

Select Case lcase(OperationtoPerform)

Case “add”
oValue=oNum1+oNum2
Case “sub”
oValue=oNum1-oNum2
Case “mul”
oValue=oNum1*oNum2
Case “div”
oValue=oNum1/ oNum2
End Select
print oValue
‘**************************************************************************
‘**************************************************************************
‘9    Find the length of a given string
Dim oStr
Dim oLength
oStr=”sudhakar”
oLength=len(oStr)
print oLength
‘**************************************************************************
‘**************************************************************************
’10    Reverse given string
Dim oStr
Dim oLength
Dim oChar
Dim iCounter

oStr=”sudhakar”
oLength=len(oStr)

For iCounter=oLength to 1 step-1
oChar=oChar&mid(oStr,iCounter,1)
Next
print oChar
‘**************************************************************************
‘**************************************************************************
’11    Find how many alpha characters present in a string.
Dim oStr
Dim oLength
Dim oChar
Dim iCounter

oStr=”su1h2kar”
oLength=len(oStr)

oAlphacounter=0

For iCounter=1 to oLength

If not isnumeric (mid(oStr,iCounter,1)) then
oAlphacounter=oAlphacounter+1
End if

Next
print oAlphacounter

‘**************************************************************************
‘**************************************************************************
’12    Find occurrences of a specific character in a string

Dim oStr
Dim oArray
Dim ochr
oStr=”sudhakar”
ochr=”a”

oArray=split(oStr,ochr)
print ubound(oArray)
‘**************************************************************************
‘**************************************************************************
’13    Replace space with tab in between the words of a string.

Dim oStr
Dim fStr

oStr=”Quick Test Professional”

fStr=replace(oStr,” “,vbtab)
print fStr

‘**************************************************************************
‘**************************************************************************
’14    Write a program to return ASCII value of a given character

Dim ochr
Dim aVal

ochr=”A”

aVal=asc(ochr)
print aVal

‘**************************************************************************
‘**************************************************************************
’15    Write a program to return character corresponding to the given ASCII value

Dim ochr
Dim aVal

aVal=65

oChr=chr(aVal)
print oChr

‘**************************************************************************
‘**************************************************************************
’16    Convert string to Upper Case
Dim oStr
Dim uStr

oStr=”QuickTest Professional”

uStr=ucase(oStr)
print uStr
‘**************************************************************************
‘**************************************************************************
’17    Convert string to lower case
Dim oStr
Dim lStr

oStr=”QuickTest Professional”
lStr=lcase(oStr)
print lStr

‘**************************************************************************
‘**************************************************************************
’18    Write a program to Replace a word in a string with another word

Dim oStr
Dim oWord1
Dim oWord2
Dim fStr

oStr=”Mercury Quick Test Professional”
oWord1=”Mercury”
oWord2=”HP”

fStr=replace(oStr,oWord1,oWord2)
print fStr

‘**************************************************************************
‘**************************************************************************
’19    Check whether the string is a POLYNDROM

Dim oStr

oStr=”bob”
fStr=StrReverse(oStr)
If oStr=fStr Then
Print “The Given String “&oStr&” is a Palindrome”
else
Print “The Given String “&oStr&” is not a Palindrome”
End If
‘**************************************************************************
‘**************************************************************************
’20    Verify whether given two strings are equal
Dim oStr1
Dim ostr2

oStr1=”qtp”
oStr2=”qtp”
If  oStr1=oStr2 Then
Print “The Given Strings are Equal”
else
Print “The Given Strings are not Equal”
End If
‘**************************************************************************
‘**************************************************************************
’21    Print all values from an Array
Dim oArray
Dim oCounter
oArray=array(1,2,3,4,”qtp”,”Testing”)

For oCounter=lbound(oArray) to ubound(oArray)
print oArray(oCounter)
Next

‘**************************************************************************
‘**************************************************************************
’22    Sort Array elements
Dim oArray
Dim oCounter1
Dim oCounter2
Dim tmp

oArray=array(8,3,4,2,7,1,6,9,5,0)

For oCounter1=lbound(oArray) to ubound(oArray)

For oCounter2=lbound(oArray) to ubound(oArray)-1

If oArray(oCounter2)>oArray(oCounter2+1) Then
tmp=oArray(oCounter2)
oArray(oCounter2)=oArray(oCounter2+1)
oArray(oCounter2+1)=tmp
End If

Next

Next

For oCounter1=lbound(oArray) to ubound(oArray)
print oArray(oCounter1)
Next

‘**************************************************************************
‘**************************************************************************
’23    Add two 2X2 matrices
Dim oArray1(1,1)
Dim oArray2(1,1)
Dim tArray(1,1)

oArray1(0,0)=8
oArray1(0,1)=9
oArray1(1,0)=5
oArray1(1,1)=-1

oArray2(0,0)=-2
oArray2(0,1)=3
oArray2(1,0)=4
oArray2(1,1)=0

tArray(0,0)=oArray1(0,0)+ oArray2(0,0)
tArray(0,1)=oArray1(0,1)+oArray2(0,1)
tArray(1,0)=oArray1(1,0)+oArray2(1,0)
tArray(1,1)=oArray1(1,1)+oArray2(1,1)
‘**************************************************************************
‘**************************************************************************

’24    Multiply Two Matrices of size 2X2

Dim oArray1(1,1)
Dim oArray2(1,1)
Dim tArray(1,1)

oArray1(0,0)=8
oArray1(0,1)=9
oArray1(1,0)=5
oArray1(1,1)=-1

oArray2(0,0)=-2
oArray2(0,1)=3
oArray2(1,0)=4
oArray2(1,1)=0

tArray(0,0)=oArray1(0,0)* oArray2(0,0)+ oArray1(0,1)* oArray2(1,0)
tArray(0,1)=oArray1(0,0)* oArray2(0,1)+ oArray1(0,1)* oArray2(1,1)
tArray(1,0)=oArray1(1,0)* oArray2(0,0)+ oArray1(1,1)* oArray2(1,0)
tArray(1,1)=oArray1(1,0)* oArray2(0,1)+ oArray1(1,1)* oArray2(1,1)

‘**************************************************************************
‘**************************************************************************
’25    Convert a String in to an array

Dim oStr
Dim iCounter
oStr=”Quick Test Professional”
StrArray=split(oStr)

For iCounter=0 to ubound(StrArray)
print StrArray(iCounter)
Next

‘**************************************************************************
‘**************************************************************************
’26    Convert a String in to an array using ‘i‘ as delimiter

Dim oStr
Dim iCounter
oStr=”Quick Test Professional”
StrArray=split(oStr,”i”)

For iCounter=0 to ubound(StrArray)
print StrArray(iCounter)
Next

‘**************************************************************************
‘**************************************************************************
’27    Find number of words in string

Dim oStr
Dim iCounter
oStr=”Quick Test Professional”
StrArray=split(oStr,” “)
print “Theere are “&ubound(StrArray)+1&” words in the string”

‘**************************************************************************
‘**************************************************************************
’28    Write a program to reverse the words of a given string.

Dim oStr
Dim iCounter
oStr=”Quick Test Professional”
StrArray=split(oStr,” “)

For iCounter=0 to ubound(StrArray)
print strreverse(StrArray(iCounter))
Next

‘**************************************************************************
‘**************************************************************************
’29    Print the data as a Pascal triangle
‘The formulae for pascal triangle is nCr=n!/(n-r)!*r!

Dim PascalTriangleRows
Dim nCr
Dim NumCount
Dim RowCount

PascalTriangleRows = 10
For NumCount = 0 To PascalTriangleRows
toPrint= Space(PascalTriangleRows – NumCount)
For RowCount = 0 To NumCount
If (NumCount = RowCount) Then
nCr = 1
Else
nCr = Factorial(NumCount) / (Factorial(NumCount – RowCount) * Factorial(RowCount))
End If
toPrint=toPrint&nCr&” ”
Next
print toPrint
Next

Function Factorial(num)
Dim iCounter
Factorial = 1
If num <> 0 Then
For iCounter = 2 To num
Factorial = Factorial * iCounter
Next
End If
End Function
‘**************************************************************************
‘**************************************************************************
’30    Join elements of an array as a string

Dim oStr
Dim iCounter
oStr=”Quick Test Professional”
StrArray=split(oStr,” “)

print join(StrArray,” “)

‘**************************************************************************
‘**************************************************************************
’31    Trim a given string from both sides

Dim oStr

oStr=”    QTP    ”
print trim(oStr)

‘**************************************************************************
‘**************************************************************************
’32    Write a program to insert 100values and to delete 50 values from an array

Dim oArray()
Dim iCounter

ReDim oArray(100)

For iCounter=0 to ubound(oArray)
oArray(iCounter)=iCounter
‘Print total 100 Values
print(oArray(iCounter))
Next
print “******************************”
ReDim preserve oArray(50)

For iCounter=0 to ubound(oArray)
‘Print Values after deleting 50 values
print(oArray(iCounter))
Next
‘**************************************************************************
‘**************************************************************************
’33    Write a program to force the declaration of variables

Option explicit    ‘ this keyword will enforce us to declare variables

Dim x
x=10
‘Here we get an error because i have not declared y,z
y=20
z=x+y
print z
‘**************************************************************************
‘**************************************************************************
’34    Write a program to raise an error and print the error number.

On Error Resume Next
Err.Raise 6   ‘ Raise an overflow error.
print  (“Error # ” & CStr(Err.Number) & ” ” & Err.Description)

‘**************************************************************************
‘**************************************************************************
’35    Finding whether a variable is an Array

Dim oArray()

if  isarray(oArray) then
print “the given variable is an array”
else
print “the given variable is not an array”
End if
‘**************************************************************************
‘**************************************************************************
’36    Write a program to list the Timezone offset from GMT
Dim objWMIService
Dim colTimeZone
Dim objTimeZone

Set objWMIService = GetObject(“winmgmts:” & “{impersonationLevel=impersonate}!\.rootcimv2”)
Set colTimeZone = objWMIService.ExecQuery(“Select * from Win32_TimeZone”)

For Each objTimeZone in colTimeZone
print “Offset: “& objTimeZone.Bias
Next
‘**************************************************************************
‘**************************************************************************
’37 Retrieving Time Zone Information for a Computer
Dim objWMIService
Dim colTimeZone
Dim objTimeZone

Set objWMIService = GetObject(“winmgmts:” & “{impersonationLevel=impersonate}!\.rootcimv2”)
Set colTimeZone = objWMIService.ExecQuery(“Select * from Win32_TimeZone”)

For Each objItem in colTimeZone

print “Bias: ” & objItem.Bias
print “Caption: ” & objItem.Caption
print “Daylight Bias: ” & objItem.DaylightBias
print “Daylight Day: ” & objItem.DaylightDay
print “Daylight Day Of Week: ” & objItem.DaylightDayOfWeek
print “Daylight Hour: ” & objItem.DaylightHour
print “Daylight Millisecond: ” & objItem.DaylightMillisecond
print “Daylight Minute: ” & objItem.DaylightMinute
print “Daylight Month: ” & objItem.DaylightMonth
print “Daylight Name: ” & objItem.DaylightName
print “Daylight Second: ” & objItem.DaylightSecond
print “Daylight Year: ” & objItem.DaylightYear
print “Description: ” & objItem.Description
print “Setting ID: ” & objItem.SettingID
print “Standard Bias: ” & objItem.StandardBias
print “Standard Day: ” & objItem.StandardDay
print “Standard Day Of Week: ” & objItem.StandardDayOfWeek
print “Standard Hour: ” & objItem.StandardHour
print “Standard Millisecond: ” & objItem.StandardMillisecond
print “Standard Minute: ” & objItem.StandardMinute
print “Standard Month: ” & objItem.StandardMonth
print “Standard Name: ” & objItem.StandardName
print “Standard Second: ” & objItem.StandardSecond
print “Standard Year: ” & objItem.StandardYear

Next

‘**************************************************************************
‘**************************************************************************
’38    Write a program to Convert an expression to a date
Dim StrDate
Dim actualDate
Dim StrTime
Dim actualTime

StrDate = “October 19, 1962”   ‘ Define date.
actualDate = CDate(StrDate)   ‘ Convert to Date data type.
print actualDate
StrTime = “4:35:47 PM”         ‘ Define time.
actualTime = CDate(StrTime)   ‘ Convert to Date data type.
print actualTime

‘**************************************************************************
‘**************************************************************************
’39 Display current date and Time

print now
‘**************************************************************************
‘**************************************************************************
’40    Find difference between two dates.

‘Date difference in Years
print DateDiff(“yyyy”,”12/31/2002″,Date)

‘Date difference in Months
print DateDiff(“m”,”12/31/2002″,Date)

‘Date difference in Days
print DateDiff(“d”,”12/31/2002″,Date)

‘**************************************************************************
‘**************************************************************************
’41    Add time interval to a date

print DateAdd(“m”, 1, “31-Jan-95”)

‘**************************************************************************
‘**************************************************************************
’42    Print current day of the week

Print day(date)
‘**************************************************************************
‘**************************************************************************
’43    Find whether current month is a long month
Dim oCurrentMonth
Dim ocurrentYear
Dim oDaysinMonths

oCurrentMonth = Month(date)
ocurrentYear = Year(date)
oDaysinMonths=Day(DateSerial(ocurrentYear, oCurrentMonth + 1, 0))
print oDaysinMonths&” Days in Current Month”
If oDaysinMonths=31 Then
print “Current Month is a long month”
else
print “Current Month is not a long month”
End If
‘**************************************************************************
‘**************************************************************************
’44    Find whether given year is a leap year

‘1st Method

‘The rules for leap year:
‘1. Leap Year is divisible by 4    (This is mandotory Rule)
‘2. Leap Year is not divisible by 100 (Optional)
‘3. Leap Year divisble by 400 (Optional)

Dim oYear

oYear=1996

If ((oYear Mod 4 = 0) And (oYear Mod 100 <> 0) Or (oYear Mod 400 = 0)) then
print “Year “&oYear&” is a Leap Year”
else
print “Year “&oYear&” is not a Leap Year”
End If

’45.    2nd Method
‘ Checking 29 days for February month in specified year
Dim oYear
Dim tmpDate

oYear=1996
tmpDate = “1/31/” & oYear
DaysinFebMonth = DateAdd(“m”, 1, tmpDate)

If  day(DaysinFebMonth )=29 then
print “Year “&oYear&” is a Leap Year”
else
print “Year “&oYear&” is not a Leap Year”
End If

‘**************************************************************************
‘**************************************************************************
’46    Format Number to specified decimal places

Dim oNum
Dim DecimaPlacestobeFormat
oNum = 3.14159
DecimaPlacestobeFormat=2
print Round(oNum , DecimaPlacestobeFormat)

‘**************************************************************************
‘**************************************************************************
’47    Write a program to Generate a Random Numbers
‘This script will generate random numbers between 10 and 20
Dim rStartRange
Dim rEndRange

rStartRange=10
rEndRange=20

For iCounter=1 to 10
print Int((rEndRange – rStartRange + 1) * Rnd + rStartRange)
Next
‘**************************************************************************
‘**************************************************************************
’48    Write a program to show difference between Fix and Int

‘Both Int and Fix remove the fractional part of number and return the resulting integer value.
‘The difference between Int and Fix is that if number is negative, Int returns the first negative integer less than or equal to number,
‘whereas Fix returns the first negative integer greater than or equal to number.
‘For example, Int converts -8.4 to -9, and Fix converts -8.4 to -8.

print Int(99.8)    ‘ Returns 99.
print Fix(99.2)    ‘ Returns 99.
print Int(-99.8)   ‘ Returns -100.
print Fix(-99.8)   ‘ Returns -99.
print Int(-99.2)   ‘ Returns -100.
print Fix(-99.2)   ‘ Returns -99.

‘**************************************************************************
‘**************************************************************************
’49    Write a program to  find subtype of a variable

Dim oVar
Dim oDatatypes
oVar=”QTP”
oVartype=Typename(oVar)
print oVartype

‘**************************************************************************
‘**************************************************************************
’50    Write a program to print the decimal part of a given number
Dim oNum
oNum=3.123
oDecNum=oNum- int(oNum)
print oDecNum
‘**************************************************************************
‘**************************************************************************

Working with ADODB connections using QTP

How to open a password-protected database.

Example:

Dim FlightNumber

Dim dbexample

‘ Create the conection object.

Set dbexample = CreateObject(“ADODB.Connection”)

‘Set the connection string and open the connection

dbexample.ConnectionString = “DBQ=D:Program FilesMercury InteractiveWinRunnersamplesflightappflight32.mdb;DefaultDir=D:Program FilesMercury InteractiveWinRunnersamplesflightapp;Driver={Microsoft Access Driver (*.mdb)};DriverId=281;FIL=MS Access;MaxBufferSize=2048;MaxScanRows=8;PageTimeout=5;SafeTransactions=0;Threads=3;UserCommitSync=Yes;”

dbexample.Open

‘or use this method if a DSN entry was created.

‘dbexample.Open(“DSN=Flight32”)

flightnumber = 6195

‘ Get the recordset returned from a select query.

Set recordset = dbexample.Execute(“SELECT * from Orders WHERE Flight_Number = ” & flightnumber)

‘ Display the results of the query.

msgbox recordset.GetString

‘ Close the database connection.

dbexample.Close

Set dbexample = Nothing

If your query returns several columns, you can use the Fields method to retrieve data from specified columns in the returned record set.

 Example:

‘ Connect to the Flight32 database

Set dbexample = CreateObject(“ADODB.Connection”)

dbexample.Open(“DSN=Flight32”)

‘ Perform a query

Set recordset = dbexample.Execute(“SELECT * from Orders”)

‘ Get the values from the Customer_Name column

while (NOT recordset.EOF)

MsgBox recordset.Fields(“Customer_Name”)

‘ Move to the next value in the record set

recordset.MoveNext

wend

‘ Close the database connection.

dbexample.Close

Set dbexample = Nothing

Does QuickTest Professional (QTP) / Unified Functional Testing (UFT) support Microsoft Virtual PC?

Version

QTP 9.2

QTP 9.5

QTP 10

QTP 11

UFT 11.5

Microsoft Virtual PC 2004

No

Yes

Yes

Yes

Yes (GUI Testing only)

Microsoft Virtual PC 2007

No

Yes

Yes

Yes

Yes (GUI Testing only)

Microsoft Virtual PC VMM 2008

No

No

Yes

Yes

Yes (GUI Testing only)

Protected: All posts in this Blog

This content is password protected. To view it please enter your password below:

Previous Older Entries